Welcome to the Chic-Peas Kitchen!


We're two best friends, Kelly and Suanne, who love to cook! We have a passion for fresh food, complex flavors, and saving time. We'll share with you what's for dinner (really!) as well as how we made it and how we can make it better.

Jump in and learn with us!
Showing posts with label breakfast. Show all posts

Friday, October 26, 2012

Pumpkin Oat Pancakes (Gluten Free)


Autumn is good for only a few things: crisp apples, no air conditioning, pretty landscapes, and the return of the Pumpkin Spice Latte. Otherwise, it really just portends the winter apocalypse, but you know, let's be positive about my toes being perpetually cold between now and April.

To cheer myself of the cold morning blues, I was craving something that tasted like fall, but preferably with slightly less sugar. Pancakes came to mind as a great carrier of pumpkin spice, and a quick scan for similar recipes landed me on Cookie + Kate's banana oat pancakes. Now, Kate is a pro - her photos are amazing, the measurements exacting. and the recipes make you drool. I adapted her recipe, adopting the oat flour so the pancakes would be more whole grain, but substituting pumpkin for the banana.


Pumpkin Oat Pancakes
1 dry cup oats
12 oz pumpkin puree
1 inch grated ginger
2 tablespoons butter, melted
2 eggs
1 tablespoon sugar
1/2 teaspoon cinnamon
1/2 teaspoon baking soda
pinch of salt, and nutmeg
1/2 cup warm water
  1. Make oat flour out of old-fashioned oats: Pour one cup of oats into a food processor and process until it is ground well. (I also added a handful of almonds to the food processor to make the pancakes nuttier.)
  2. Beat the eggs in a mixing bowl.
  3. Add the pumpkin puree, butter, ginger, and sugar to the eggs and mix.
  4. In a larger mixing bowl, mix the oat flour, baking soda, salt, and spices
  5. Make a well in the middle of the dry ingredients and pour in the wet ingredients. Stir a few times to incorporate.
  6. The batter should be the consistency of melted ice cream. If it is too thick, add water or milk to thin it. Let the batter sit for 5-10 minutes for the oats to soak up the liquid.
  7. Heat up a skillet or non stick pan. Spray with cooking spray if you're not using a nonstick.
  8. Pour 1/4 cup of batter into the pan (to make a regular sized pancake). I made mini's so these were about 2 tablespoons of batter.
  9. Cook for 3-4 minutes, until the pancake is cooked at the edges and the pancake comes off the pan easily. The pan side should be golden brown.
  10. Flip and cook for another 2 minutes
  11. Serve with maple syrup and apples.

Tuesday, July 24, 2012

Almond Honey Nut Clusters

After my experiments with Snack Packs and working with raw nuts, I definitely learned a lot - about what I liked, about what tasted good, and what was practical for the kitchen. I wanted to tweak and keep trying. This last batch was sooooo tasty, it disappeared in under a week. This version is also made entirely on the stove top - no hot ovens! I will admit though - I eyeballed the entire recipe, so so made additions/substitutions.


Almond Honey Nut Clusters
Makes 8-10 snack servings

1 1/2 lb almonds
3/4 cups pumpkin seeds
1 cup sesame seeds
1 cup dried cranberries

1 cup honey
1 tbsp butter
1/2 teaspoon salt
1 teaspoon garam masala


  1. Heat a large frying pan on medium until warm. Add the almonds and toast, stirring every few minutes. It should take 15-20 minutes to roast and become crunchy.
  2. In a small pot, heat the honey and butter on medium to medium low heat. Make sure the pot is big enough to hold all the nuts. Stir every few minutes to create a thick caramel. If it starts getting bubbly, its a good sign, but if it gets really bubbly, turn the heat down a notch. Caramel should form in around 20 minutes.
  3. At the 15 minute mark (when your caramel is almost done and your almonds need an extra 5 minutes) toss in the pumpkin seeds and sesame seeds in with the almonds. Roast for the 5 minutes. Since these seeds are smaller and thinner, they take much less time to become crunchy.
  4. Line a large baking sheet with aluminum foil. Scatter the cranberries across the pan. 
  5. When the caramel and the nuts are done, pour the nuts into the pot with the honey caramel. If one needs more time, you can set the heat to low on the other to give yourself enough time to get things to equal out. 
  6. Stir the nut mix and honey thoroughly, making sure to coat the almonds well. I had too much caramel and ended up dumping in more almonds, but do what you like!
  7. Pour the nut and honey mixture out on to the baking sheet, over the cranberries. Flatten out and try to separate into clusters. (But don't burn yourself!)
  8. Allow the nut mix to cool at room temperature and for the caramel to harden to a nice glossy shine. 
  9. When cool to the touch, separate into smaller clusters and store in an airtight bag or container. So far they've been good up to two weeks later. Keep in a cool place. If they get hot they'll stick together all over again!

Wednesday, April 18, 2012

Ricotta Egg Souffle "Muffins"

I'm pleased to report that I have been much better about my breakfast routine over the last few months. The nut mixes went over well and I enjoyed experimenting with various kinds of muffins. But too much of a good thing leads to bad things, and I needed a change. The muffins were low fat and flavorful, but had more sugar than protein (there are only so many almonds I can cram into a muffin cup). And as the food gurus will tell you, protein is the way to start the day.

Most people do something with eggs for breakfast. There are only a few ways I like eating eggs and unfortunately a poached egg is not a portable food. So when I came across a South Beach Diet forum post about ricotta egg muffins, I was intrigued. I have a lot of ricotta and eggs in the fridge, so this would be a good fit for me. The forum gave directions for a sweet version but a later poster said the savory was the way to go. On top of it, the recipe was super simple.

I decided to experiment and made two kinds. One strawberry cheesecake inspired and one spinach and scallion. To my surprise, the "muffins" came out just like souffle - airy, light, warm, and fluffy. And after they cooled, they actually collapsed into themselves... so if you're making for guests, serve promptly. I was planning on refrigerating mine for the week so I had grab and go breakfasts. I reheated one in the microwave this morning and the spinach was amazingly delicious. I also had a strawberry one, which was good, but not as satisfying as the spinach. Going forward, I'm going to double the batter - two souffles makes one content Suanne. One just didn't cut it.


Spinach Scallion Ricotta Egg Souffle "Muffins"
Makes 12 small souffles (and maybe 6 large ones if I find the right pan)

1/2 cup frozen spinach
1 scallion
4 eggs
2 cups ricotta cheese (drained)
1 teaspoon salt
Sriracha hot sauce to swirl in (optional, but probably why mine are so addicting)

  1. Preheat the over to 400 degrees F.
  2. In a mug, cook the spinach and scallions in the microwave. Squeeze out all excess water. 
  3. In a mixing bowl, whisk together the egg and ricotta and salt. Add the spinach and scallions.
  4. Oil your muffin pan with olive oil or spray. Spoon in 2-3 tablespoons of batter per cup. 
  5. Squirt a little Sriracha over the tops and swirl into the top of the souffle.
  6. Bake for 20-30 minutes until a toothpick comes out clean (Mine were exactly 25 min.)
  7. Use a butter knife to separate the souffle from the sides of the pan before pulling out.
  8. Stores in the refrigerator for about a week. Reheating is optional but 30 seconds in the microwave should do it. Enjoy!

Sunday, April 1, 2012

Pear Cardamom Muffins (Low Fat)

I love love love pears. From happy Bosc to crunchy Korean, pears are a delicate and delicious fruit. I love them poached, in salads, the JellyBelly version - you name it, its delicious. So after making three batches of the Apple Cinnamon Muffins, I needed a little change and pears just happened to be on sale!

This version stays pretty true to the Apple Cinnamon recipe, incorporating applesauce (or in this case pear-sauce) rather than using oil. The pear sauce is cooked with cardamom, which is a fragrant Indian spice that is often used in chai tea, kheer (rice pudding), and other sweets. The cardamom lends an exotic feel to a rather homey muffin. I also added a bit of low fat yogurt to this recipe to add a bit more moisture and fluff. The yogurt has this way of making the muffins more cakey.

Yes,  its the same picture for the apple cinnamon muffins. Sue me, they look exactly the same!

Pear Cardamom MuffinsMakes 1 dozen regular muffins or 9 larger muffins

1 1/2 cup flour3/4 cup sugar1 1/2 teaspoon baking powder1 teaspoon cinnamon
1/4 cup chopped almonds or walnuts
pinch of salt 1/2 cup milk1 1/2 cup pears, diced
4 cardamom pods, seeds only and chopped1 egg, beaten
3 tablespoons low fat yogurt


  1. Heat oven to 375 degrees.
  2. Sift all dry ingredients together in a bowl. (Flour, sugar, baking powder, cinnamon, salt, nuts).
  3. Make pear sauce. Place 1/2 cup diced pears in a microwave safe mug, then add a teaspoon of water and the cardamom seeds. Cover with a small plate. Microwave on high for two minutes. Mash with a fork and microwave until the pears have broken down to an applesauce texture. A little over or under cooked is fine. 
  4. Add all wet ingredients: diced pear, pear sauce, egg, milk, and yogurt. Mix by hand to incorporate, but don't go crazy, since over mixing yields denser baked goods. Mix only as much as necessary.
  5. Line a muffin tin with paper liners or a few sprays of Pam or canola oil. Spoon about a 1.5 tablespoons into a each liner. (Or two tablespoons for the larger muffins, which the batter will fill almost the whole cup.)
  6. Bake for 20-25 minutes. Cool before eating.

Tuesday, March 27, 2012

Chocolate Almond Muffins (Low Fat)

On my never ending quest to make breakfast a priority rather than an after thought, I proudly present you with Chocolate Almond Muffins. Reminiscent of Cocoa Puffs and the cocoa dusted Diamond brand almonds, the muffin is chocolately, but not overly so, and chock full of nutty goodness. I modified the recipe from Sparkpeople (link) and used ingredients I had on hand. Unfortunately that meant the muffins would be low fat rather than fat free, but its not like I'm counting calories anyway.


Chocolate Almond Muffins
Makes 12, takes 20-30 min


1 1/3 cup all purpose flour
1/3 cup cocoa
2/3 cup sugar
2 tsp baking powder
1 1/4 tsp baking soda
1/2 cup slivered almonds

3/4 cup (6oz. container) low fat yogurt
3/4 cup milk
1 tsp vanilla

  1. Pre-heat oven to 400 degrees.
  2. Mix all the dry ingredients in a bowl, sifting to avoid large lumps. Include the almonds here.
  3. In a different bowl, mix all the wet ingredients.
  4. Pour the wet ingredients into the dry bowl and fold. Be careful not to overmix the batter as this will make the muffins too dense. Its okay if there is still some dry powder here and there.
  5. Bake for 12 minutes. 
  6. Cool and enjoy.
       

Sunday, March 11, 2012

Apple Cinnamon Muffins

I'm always hunting for ways to make sure I eat breakfast. A simple apple muffin recipe caught my eye, and oh, do they make the kitchen smell heavenly! I modified the original recipe to eliminate the oil, add a kick of candied ginger, and add some crunch with slivered almonds.

If you don't want to add oil to a recipe, you can replace the oil with applesauce or pureed pumpkin in a 1:1 ratio. I didn't want to use oil or open a jar of applesauce just for one batch of muffins. So I made my own applesauce in the microwave. I put about 1/2 a cup of diced apple in a mug, covered it,  microwaved it for a minute and a half, and mashed it with a fork. To remove excess water, I microwaved it for another minute to get the right consistency for applesauce. I did not add extra sugar or cinnamon for the applesauce, just used it straight out of the microwave. The muffins came out great without the oil or processed applesauce!


Apple Cinnamon Muffins
Makes 1 dozen muffins

1 1/2 cup flour
3/4 cup sugar
1 1/2 teaspoon baking powder
1 teaspoon cinnamon
pinch of salt
1/2 cup milk
1/3 cup applesauce or canola oil
1 egg, beaten
1 cup finely diced apples
1/4 cup slivered almonds or walnuts
2 tablespoons diced candied ginger
brown sugar to sprinkle on top (optional)

  1. Heat oven to 375 degrees
  2. Sift all dry ingredients together in a bowl. (Flour, sugar, baking powder, cinnamon, salt).
  3. Add all wet ingredients, apple, nuts, and ginger. Mix by hand to incorporate, but don't go crazy, since over mixing yields denser baked goods. Mix only as much as necessary.
  4. Line a muffin tin with paper liners. Spoon about a 1.5 tablespoons into a each liner, then top with about a teaspoon of brown sugar (optional).
  5. Bake for 20 minutes. Cool before eating.

Monday, November 28, 2011

Baked Sweet Potato with Banana

Nothing says autumn like the smel of warm cinnamon wafting out of the kitchen after coming in from a nippy day. I love whipping up this easy side dish to get the oven going. Also makes a great breakfast!


Baked Sweet Potatoes with Banana
Serves 4 as sides

3 sweet potatoes, peeled and cubed into 1 inch pieces
1 ripe banana cut in one inch pieces (feel free to substitute for apples or pears)
1/4 cup dried cranberries, roughly chopped
1/4 inch grated ginger
1.5 tsp cinnamon
pinch of ground cloves
2 tablespoons brown sugar
1 generous squirt of honey
1/4 cup water
1/4 cup slivered almonds to top

  1. Preheat the oven to 350 degrees
  2. Prep the sweet potatoes, banana, and cranberries. Toss into a glass baking dish, preferably one with a cover. I used a 9 inch round glass dish with 2 inch sides.
  3. Top with the brown sugar, cinnamon, clove, ginger, and honey. Stir to incorporate.
  4. Add 1/4 cup water
  5. Cover with aluminum foil or the cover.
  6. Bake for 30 minutes.
  7. Stir contents to re-incorporate the sugars. Covering the baking dish should have made the sweet potatoes cook mostly through.
  8. Top with the almonds and bake uncovered for another 15 minutes.
  9. Cool for 5 minutes prior to serving.

Sunday, October 23, 2011

Easy Pumpkin Muffins

If you know anything about Kelly and I, you know we're suckers for pumpkin goodies. Pumpkin spice latte's, pumpkin loaves, pumpkin cheesecake - you name it, we want it. Its almost a shame that pumpkin is an autumn-only food.

Today's post celebrates pumpkin season in the spirit of my recent breakfast goods kick. When you Google "pumpkin muffins," the first result isn't the Food Network or Recipes.com. Its a food blog called "Smitten Kitchen" Of course, I modified the recipe, adding a few other fall ingredients.

Pumpkin Muffins
Adapted from the American club, in Kohler, Wisconsin via Gourmet Magazine via Smitten Kitchen

1 1/2 cups all-purpose flour
1 teaspoon baking powder
1 1/2 cup canned solid-pack pumpkin (from a 15 ounce can)
1/4 cup vegetable oil
3 eggs
1 1/4 cups sugar
1/2 teaspoon baking soda
1/2 teaspoon salt
1 1/2 teaspoon cinnamon
1/2 teaspoon clove
1/2 teaspoon nutmeg
1/2 cup chopped walnuts
1/2 cup chopped cranberries
1/2 teaspoon orange zest
1 tablespoon grated ginger

1 tablespoon sugar and 1 tablespoon cinnamon to top
  1. Put oven in middle position and preheat oven to 350°F. Butter muffin tins.
  2. Whisk together pumpkin, oil, eggs, spices, 1 1/4 cups sugar, ginger, baking soda, and salt in a large bowl until smooth. Add walnuts and cranberries. Then whisk in flour and baking powder until just combined.
  3. Stir together cinnamon and remaining 1 tablespoon sugar in another bowl.
  4. Divide batter among muffin cups (each should be about three-fourths full). 
  5. Sprinkle tops with cinnamon-sugar mixture. 
  6. Bake until puffed and golden brown and wooden pick or skewer inserted into the center of a muffin comes out clean, 25 to 30 minutes.
  7. Cool in pan on a rack five minutes, then transfer muffins from pan to rack and cool to warm or room temperature.
Yields about 12-18 muffins. Sorry no pictures - I ate them too quickly!

Sunday, October 9, 2011

Quick Plum Granola Cobbler

I tried another batch of granola bars today and had a ton of little granola scraps at the bottom of the dish. Of course I could just enjoy as crumbly and delish as is - but why not have some fun and enjoy some extra vitamins too? Its quick, easy, and makes a super fast warm breakfast or low fat dessert.


Quick Plum Granola Cobbler
Serves 1, 10 min

1 plum diced
2 tablespoons granola
3 tablespoons milk

  1. In a little bowl or dish, layer in diced plum. 
  2. Top with granola from leftover granola bars scraps.
  3. Spoon milk over the mixture
  4. Microwave 1 minute
  5. Devour
Would be excellent with peach or apple, berries or pineapple - really just go crazy.

Monday, September 26, 2011

Chocolate Chip Muffins

What do you give at engagement parties? While most cases I'd fall to a bottle of wine, in this case, the couple didn't drink often. So what to do?

The future bride mentioned a penchant for chocolate chips. The party was happening at brunch - so what better than homemade muffins?

I followed the recipe on Food.com which got really good reviews, and actually argued the recipe called for too MANY chocolate chips! Like. And it was fast. I would totally make them again.

Tuesday, September 20, 2011

Nigella Lawson's Granola Bars

I hate mornings. I loathe getting up, forcing myself away from the comforts of my soft bed, and stabbing myself in the eye with a mascara wand due to fatigue. I can understand "seize the day" and "the early bird gets the worm" but I'd rather work past midnight than be at the office at 8 am. Its just so painful for me!

The very negative side effect of hating mornings is that I tend to skip breakfast. Often. In my haste to be on time and make that conference call, I completely forget to put any food in my stomach. Or worse, I'll just eat a cookie instead of something healthy.

Which leads me to this post about granola bars. Why buy a box of rock hard oat bars with nasty raisins, when I can make mine custom to what I like to eat, and just a smidge of sweetness? Why settle for processed food when I can enjoy a little homemade TLC? I sifted through many recipes before I settled on Nigella Lawson's Breakfast Bars - too many recipes called for a ton of butter, things like flax seeds, or maple syrup - none of which I really wanted in my breakfast or in my tiny kitchen.


I substituted sliced almonds instead of peanuts and used a mix of salted pumpkin seeds and sesame. I really liked the taste and texture of the mix. I found the recipe was a bit too sweet - even though it doesn't call for extra sugar, the condensed milk and sweetened coconut was a little much. The bars also had a duplicitous texture - the top was quite dry and the bottom was very moist. Baking it at a low temperature seemed only to allow the condensed milk to sink to the bottom rather than incorporate everything together. As I removed the bars from the pan, they tended to crumble a little, and I had to break out some sushi rolling skills to make sure they stayed in little bars.

I do really like how they taste and it was super easy to make. Supposedly they store well (and actually get better over time) so we'll see how the bars in my desk vs my freezer fare over the next week and if the texture improves. If I make this again, I would probably soak the oats in some water first, drain them, and then use 2/3rds of the condensed milk. Additional cons are the lack of health benefits in condensed milk (I'm estimating the calorie count for this bar at around 170 but with a hefty amount of saturated fat) and the cost - a Nature Valley bar retails at 59 cents a bar but the ingredients for my bar cost 50 cents each - what about labor?

But the important thing is - will I like them enough to make sure I always eat breakfast?

Monday, September 12, 2011

Baked Egg in Tomato Stew

I made my hearty tomato stew last week and I really really enjoyed it. When the weekend rolled around though, I didn't feel like making anything new. Lucky for me, my leftover turned out to be the base for a perfect baked egg!


Baked Egg in Tomato Stew
Serves 1

1/3 cup Tomato Stew
1 egg
Salt and pepper to taste

  1. Turn the oven on to 350 degrees.
  2. In a ramekin or small oven safe casserole dish, spoon most of the tomato stew and reserve a two spoons.
  3. Press an indent in the middle of the stew and crack the egg in. Season egg with salt and pepper.
  4. Spoon the remaining stew over the top to cover the exposed egg whites.
  5. Bake uncovered for 12-15 minutes until whites are cooked through.
  6. Optional: Top with a mozzarella stick. Serve with toast or potatoes.
Clean dish! <3

Thursday, August 18, 2011

Breakfast Egg Burger

Weekend mornings are always such a treat. You get to wake up late, see the sun, and enjoy a leisurely breakfast rather than scarf down the fastest thing available. Today's recipe uses my old breakfast standbys - egg, spinach, mushroom, and bacon - and develops it into a new portable food that is sure to please.


Breakfast Egg Burger
Serves 1

1/2 strip (1 tablespoon) of diced bacon
One handful frozen chopped spinach
3 mushrooms, sliced
1 clove garlic, minced
1 egg, beaten
1 bagel thin, or 2 slices thick toast

Optional condiments: Guacamole, sriracha, mayo, hollandaise, ketchup

  1. Prep ingredients as directed.
  2. Heat 1 tablespoon oil in a nonstick pan. Saute garlic until fragrant, then the bacon.
  3. When bacon has rendered fat and is mostly cooked, add spinach and mushroom. 
  4. When spinach and mushroom have released most of their water and is fully cooked, heap into a patty sized pile in the pan. If you have one, take a metallic round cookie cutter or mold and place around the patty. Lower the heat to medium low.
  5. Pour about 1/3rd of the scrambled egg into the mold, or in the middle of the vegetable heap. Scrape any escaping egg back into the heap. Repeat and add another 1/3rd of the egg.
  6. When the egg is mostly solid, take a spatula and flip the whole thing over. Poke a hole in the middle of the heap and add the last of the egg. When set, flip one more time until egg is fully cooked.
  7. Toast the bagel, top with condiments, lettuce, tomato, whatever, and consume.

Tuesday, June 28, 2011

Scallion Pancakes

A staple Chinese snack, often eaten at dim sum, is the green onion pancake, or scallion pancake. The origins of the humble pancake are rather uncertain, but the sweet and salty crunch make this an undeniable treat! The method is very similar to making parathas, which is an Indian style flatbread. Basically, the key to the bread is creating many layers to add air, dimension, and texture. With parathas, you would do this by rolling out a circle, coating the top in oil, then crimping the dough like a paper fan (before you unravel it). With the scallions, we roll the dough into a flat circle, add the sesame oil and scallions, then roll the circle together.

Thanks to the following blogs, who have great pictures and helped me formulate my recipe! Live2Cook, Tigers and Strawberries, and Appetite for China. I totally recommend visiting one or a few of them because they've photographed the rolling and folding process so you can do it too!


Scallion Pancakes makes 15 4-inch pancakes
3 cups all-purpose flour
1 cup HOT water
3 large scallions, chopped finely. Try to get scallions with much more green than white. Although the whites are useable, they do not impart as sweet a flavor as the green.
2 tsp salt
2 tsp sesame oil (or vegetable oil)
1 tbsp vegetable oil for frying

  1. Mix the flour and salt together in a large mixing bowl. Add the hot water in slowly - a few tablespoons at a time. Mix slowly with a spatula (its hot water - using your hands is not a bright idea) until all water is incorporated and you have a ball of dough. 
  2. Knead well until smooth (I had a lot of uneven flour). Cover with plastic wrap or a towel and allow to rest for one hour. Make sure you push the plastic wrap or towel right up to the dough so a skin doesn't form. The heat will allow the dough to rise and continue smoothing out.
  3. When the dough is finished resting, cut off a ping pong sized ball of dough. Roll between your palms into a ball and place on your baking mat. Dab a drop of sesame oil onto the top of the ball and brush a little onto your rolling pin. Roll out the dough into a thin circle (about 4-5 inches).
  4. Brush the top of the circle with sesame oil - just a mere layer, you don't need a lot.
  5. Sprinkle scallions over the top into a thin layer.
  6. Roll the circle up into a rope, then coil into a flat jelly roll, or cinnamon roll.
  7. Flatten with your palm and brush the top of the coil with a tiny bit more sesame oil.
  8. Roll the coil out into a 4 inch circle. It should not be thinker than 1/4th of an inch.
  9. Place on plastic wrap or waxed paper, cover, and keep rolling!
  10. To cook, heat 1 tbsp oil in a nonstick pan. When hot, reduce heat to medium, and place the pancakes in the pan, but make sure they aren't touching. Make sure to wiggle them a little so you're sure they don't stick.
  11. When the edges become translucent, go ahead and flip them over. They should develop nice brown toasty spots on either side.
  12. Serve with soy sauce mixed with a little bit of sriracha and sesame seeds! Or make a sandwich with egg in the middle. Enjoy!

Monday, May 9, 2011

Mango Smoothie

Mango mango mangoes! Mangos are definitely one of my favorite fruits. So when I saw them on sale, I definitely bought too many - and they were all ripe. So hence today's recipe, which combines mangos and other fruits into a delectable smoothie (or shake, depending how you think about it).

Mango Smoothie
Yields 4 cups - 2 large servings

2 ripe mangoes
2/3 banana
1 apple
1/4 cup milk
2 tablespoons unsweetened yogurt
Optional: 3 tablespoons vanilla ice cream (it had to be eaten - it was getting all crystallized. So sue me.)

  1. Peel the banana, core and cut your apple into large chunks. Toss into the trusty blender and pulse a few times.
  2. Peel and dice the mango - this will be messy. Toss into blender with the yogurt, milk, and maybe the ice cream. Blend until smooth.
  3. For a thinner shake, use more milk. For a thicker shake, use more ice cream, ice, or less ripe mango.
  4. Enjoy!

Saturday, September 11, 2010

Tropical Paradise Muffins, or Kelly's Fruity Muffins


It's finally fall! I love fall - the beautiful, cool weather; the changing leaves; the hearty foods! And of course, now that the weather's cooling off, it means a lot more baking.

I woke up this morning and wanted something sweet. I thought about pancakes, but they can be so cliche. So, as I surveyed my kitchen (and found an overabundance of fruit), these muffins sort of materialized in my head.

They're a perfect transition from summer to fall: they take the tropical flavors of summer and marry them into a very dense, sticky, baked treasure of delectable yumminess. Mmmm!

Ingredients:
1 1/3 cups cubed watermelon (all seeds removed!)
1/3 cup of strawberry-banana juice
2.5 ripe bananas

1 1/2 cups flour
1 tsp. baking soda
1/4 cup sugar
1/2 cup brown sugar
2 heaping tbs. apple sauce
3/4 cup shredded coconut, unsweetened
1/2 cup oatmeal

  1. Preheat oven to 375 degrees Fahrenheit.
  2. Grease muffin tin. (I used muffin liners, but they stuck to the muffins big time. Therefore, I highly suggest greasing your pan instead!)
  3. In a large bowl, combine flour, baking soda, sugars, and applesauce.
  4. In a blender, puree watermelon, juice, and bananas.
  5. Add half of the puree to the flour mixture and blend well, making sure to scrape down the sides. Repeat with second half of puree.
  6. Fold in coconut and oatmeal.
  7. Pour into muffin tin and bake until top is dark golden brown and springs back when pushed. You can also use the toothpick test - insert a toothpick and if it comes out clean, the muffins are done! **Note: This batter doesn't rise very much, to fill your pans almost to the top.
Yields approximately ten to twelve muffins.

Wednesday, July 21, 2010

Fruit Salad --> Fruit Parfait

I loooooooooooooove LOVE loooove summer. Not just because it warm out, or the leisurely way everyone goes about their lives. But because of the FRUIT. When you walk around parks with the farmer's markets, the fruits call to you, screaming, "EAT ME!" They tempt you as you peruse by with their scented nectar, pulling you in with their perfume. The berries, the peaches, the pineapples and melons. And they seem to get me every time.

And then Suanne has a treasure trove of fruit. In a one-person household -____-;;

Now Kelly will tell you she freezes her fruit. Suanne will tell you its a crime of nature not to eat them now. hahaha. So I make fruit salad!

My most recent fruit salad included strawberries, peaches, apple, and orange segments plus zest. Let me tell you how to segment an orange - otherwise called supremes.

You can watch chef Ming (and his always color coordinated dish towels to his shirts) supreme an orange here:


Technique: How to Supreme Citrus Fruit
  1. Get a SHARP knife. This will not work with a butter knife. If you need zest, zest the fruit first.
  2. Take your orange/lemon/lime/grapefruit/pomelo and slice off a bit from the top and bottom. (aka the part where the stem was). You want to cut enough so that you slice through the pith (the white squishy part) and can see the fruit.
  3. Stand the fruit on the sliced edge.
  4. Slice the fruit from the top, cutting with the curve of the fruit, separating the pith/skin from the fruit. This will make orange juice on your cutting board, so make sure you have a good hold on the fruit. Take your time.
  5. Continue to slice all the pith and skin from the fruit so you have a globe of solid orange/lemon/whatever.
  6. When you look at the fruit, you should see the longitudinal lines (vertical) that separate the segments. Cut just a smidge to the left and right of these lines and wiggle the supreme out. Now you have yummy fruit, with no pith or membranes! Isn't that faster than peeling?
  7. Take the leftover membrane after you've removed all the segments, and give it a good squeeze. Reserve if you need some of the juice :)

And now for the parfait! When you have too much fruit salad, or just want to dress it up, grab some yogurt and you have a very impressive breakfast or light dessert.


Summer Fruit Parfait
Serves four large portions or six smaller ones

Two peaches
1 apple (granny smith or fuji)
1 orange
pint of strawberries
honey
plain or vanilla yogurt
sliced nuts (almonds for me)

  1. Wash and dry your fruit.
  2. Get rid of leaves, pits, and not so yummy parts of the fruit, like bruises
  3. Zest and supreme the orange (no juice!! just the supremes and zest!)
  4. Slice your fruit into 1/2 inch cubes. (the smaller the cubes, the prettier the parfait. Bigger cubes are great for just salad)
  5. Toss in a big bowl!
  6. Squirt a teaspoon of honey over the top, mix well. (if you just want salad stop here)
  7. Grab 4 or 6 wine glasses
  8. Add 3/4 an inch of fruit.
  9. Add a layer of yogurt. Add a layer of fruit, yogurt, etc until you hit the top
  10. Top with yogurt and the nuts.
  11. Serve within 30 min. Salad is good for about 24 hours, then it gets kinda soppy.
  12. ENJOY!

Monday, May 3, 2010

Breakfast of Champions: Fiesty Frittata

Frittata is an egg-based dish similar to an omelette or quiche, either simple or enriched with additional ingredients such as meats, cheeses, vegetables or pasta. It may be flavored with herbs.


When I had a 1.5 hour commute last summer, I had to leave the house by 7:15 am to get into the city on time. Getting up extra early means you run out of steam much earlier than lunchtime and you ed up regretting not eating something before hopping in the car! That's where this super frittata comes in - its like a protein brownie, filled with all my favorite things and sealed together with an egg. You can replace the ingredients for anything you like, so feel free to wing it. But DO have everything chopped and prepped before you turn the skillet onto the stove - trust me, there isn't enough time to chop or wash in between.

You will need one special tool - a non-stick oven safe skillet or saucepan with 2 inch (at least) tall sides. And a spatula that won't scratch up the pan!

Feisty Frittata
one hour - includes ALL prep and 20 minutes of baking
One nine inch skillet = 6 large breakfast portions


1 small onion, diced.
3 italian sausages. Squeeze the meat from the casing so you get ground sausage.
3 cloves garlic, minced

2 cups frozen spinach, microwaved and pressed out so there's no extra water
1.5 cups diced mushrooms (1/2 inch cubes)
1 tsp tomato paste
1 cup cheese

6 large eggs (8 small ones) , cracked in a large bowl and beaten (ie for scrambled)
1/2 cup milk
1/2 tsp each salt and pepper
1/2 tsp sriracha - optional
1 tbsp freshly minced parsley


  1. Prep all your ingredients. Everything must be chopped, minced, squeezed and cracked before moving on. This takes the longest, but I guarantee its worth it!
  2. Preheat your oven to 350 degrees.
  3. Heat up your skillet on high. Add 1 tbsp of oil (canola in my case) and coat the pan AND the sides generously. everything goes in this pan and you do not want to be scraping egg off the pan at the end of the meal! Don't skimp here.
  4. When the pan and oil are hot, add the sausage. Use the spatula and a spoon or something to break the sausage up so it crumbles like ground beef. This takes work. If you use bacon or diced chicken, its not as bad, but make sure the pieces are tiny - 1/2 inch cubes are good.
  5. The sausage will take a while to cook through and things will start to stick. Add the onions and garlic here to deglaze the pan while you keep working at cooking the sausage through.
  6. When sausage is cooked mostly through (no visible pink) add the mushrooms and spinach. Make sure the spinach is as dry as possible! Mushrooms and spinach give off a lot of water and you have to cook off all the water before adding the egg.
  7. Add the tomato paste, salt, pepper, and hot sauce (if applicable). Keep cooking off more water. The contents of the pan will significantly diminish as the water evaporates. Lower heat to medium.
  8. While you're cooking off water, beat the eggs in a large bowl and then add the milk. The milk helps make eggs fluffy! And we like fluffy :)
  9. When you've cooked off all the water (the bottom of the pan should appear dry) you can mix in the cheese and parsley slowly, one handful at a time. Check the amount of stuff in the pan. The pan should be no more than 50% full (to the rim of the pan.) If you have more than that, scoop it out and serve that over rice or something. Scrape down the stuff from the edge of the pan to the bottom. If you leave stuff on the sides of the pan, it may burn when you bake the frittata.
  10. Pour the egg-milk mixture over the sausage-spinach mix. The egg will fill the spaces between the mixture. Do not fill the pan past 75% up the side of the skillet! (The egg will rise cuz they're fluffy). Mix the contents of the pan gently - you don't want all the yummy stuff to be on the bottom of the pan, you want it to be incorporated throughout. Help some of the stuff get suspended in the egg. Let this cook on medium for about five minutes and make sure your oven has reached 350.
  11. Pop the whole thing in the oven on the middle rack. If you don't have a oven-safe skillet, you can make everything in the pan first, transfer the stuff to a baking pan, and then top with the egg mix. Cook for 20 minutes until top is slightly browned and the whole frittata is cooked solid. Let the frittata rest for at least 5 minutes before serving.
  12. Cut with a spatula that won't hurt your pan. Serve warm or cold, with a side of bread or salad.

Friday, April 30, 2010

Eggs to go!

I recently started a new project that transferred me to work in another office. It adds 30 minutes to my commute every day and they're a little stricter about being timely and hitting the ground running. AKA for me, no shredded wheat and yogurt at my desk at 9:30 am - I need to eat before I get there. (Getting up EXTRA early? Super bummer.)

As you may have figured out by now, I'm a big fan of poached eggs. Eggs make perfect breakfast foods because they are single small servings that are packed with protien that will keep you running through the day. I made a serving of bacon kale last night for this morning and splurged on buying turkish pide bread I found at my supermarket. But I wanted to have my egg and eat it too!

The microwave-engineers-that-be are one step ahead of me! http://www.whatscookingamerica.net/eggs/microwaveeggs.htm

Microwave poached egg

Grab a mug and fill with half a cup water. Mugs are perfect because they're deep and will make your egg the perfect circle!
Grab a fresh egg. Crack the egg and gently ease it in the mug. The egg will fall to the bottom. If the yolk is still whole, poke it with a fork. (The yolk can explode).
Cover the mug with plastic wrap.
Cook the egg on full power for 1.5 to 2 minutes.
If you're doing this for the first time, better to overcook when in doubt. If the egg doesn't looked completely done, let it sit in the water for another half minute and make sure the egg white is solid. (Mine took 2.25 min but I was also running the toaster for my pide!)
Pour out excess water slowly over a slotted spoon. Serve with a pinch of salt and pepper

Sunday, April 25, 2010

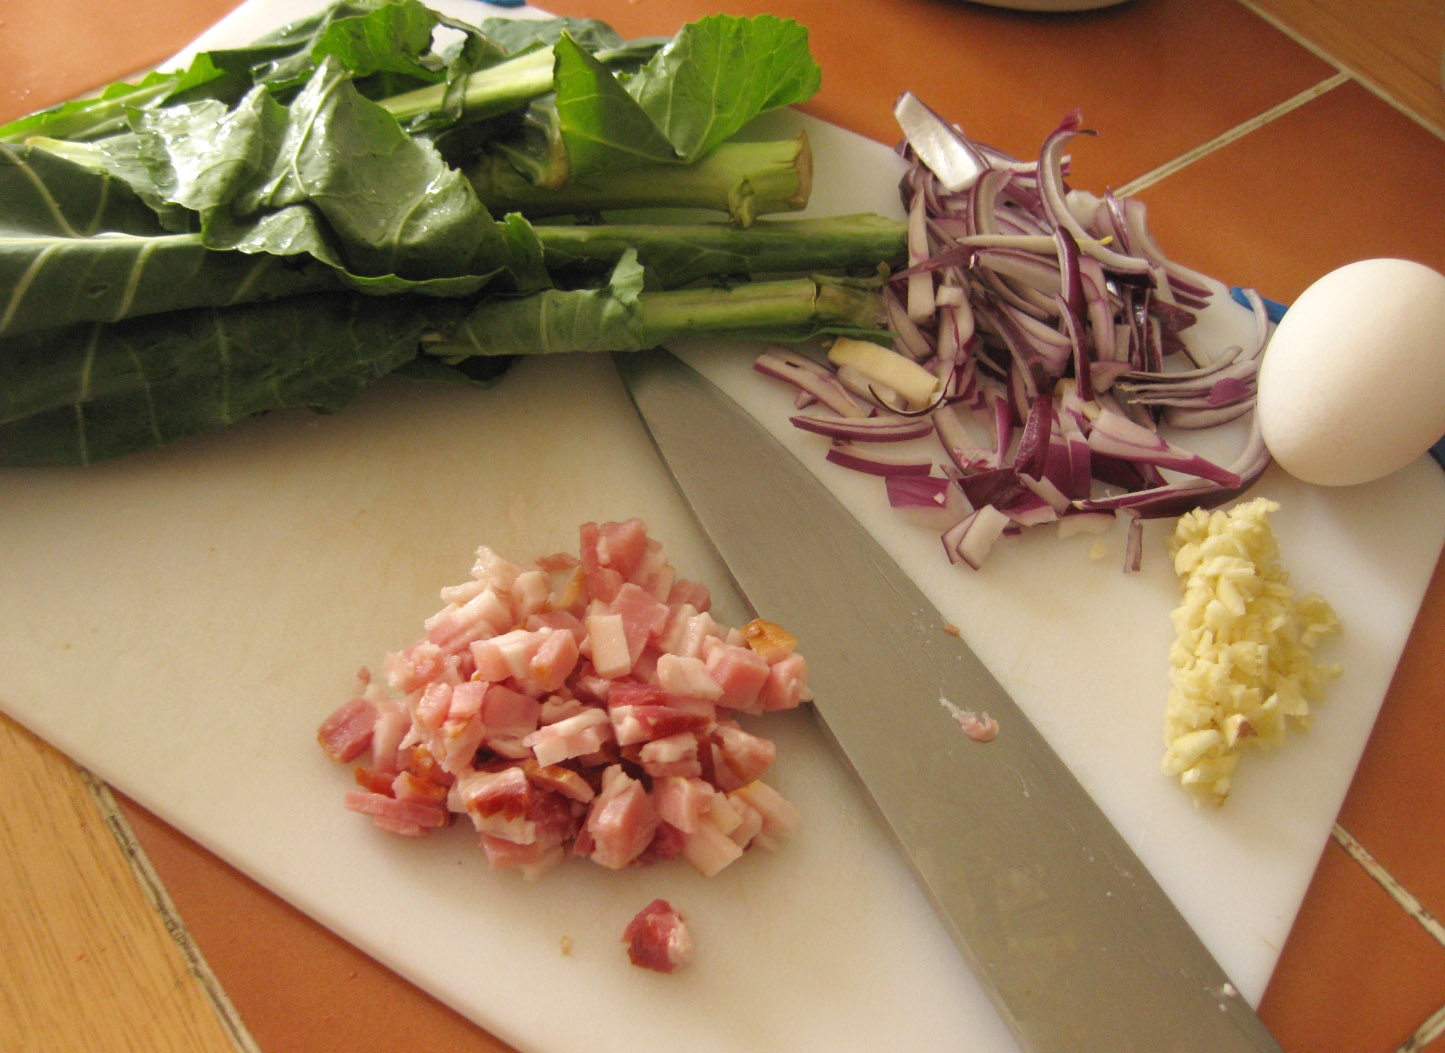
Brunching in Style: Poached Egg over Collard Greens with Bacon

Weekend mornings are special times. You wake up late and want something rich and decadent, not too much, but enough to last you until dinner. This is how brunch was made, my friends.

Today's brunch is rich and full of color. Its sure to impress if you had a midnight guest and will be filling enough to last you through the afternoon.

The collard greens can be replaced with spinach or green beans or practically anything. But the richness of the egg yolk and bacon complement the slight bitterness in leafy greens. The bacon renders a lot of fat so you should not need any oil (unless you replaced it with turkey bacon or ham).

Serve with toast triangles, a mimosa, and follow with coffee and a piece of chocolate.


Poached Egg over Collard Greens with Bacon
Serves one. 30 minutes

2 cloves garlic, minced
1/2 red onion, halved, then thinly sliced (julienned if you will)
5 big leaves collard greens. Separate leaves from stems. Leaves should be sliced in ribbons, stems diced. (It looks like a lot but it shrinks)
1 1/2 slices bacon, diced 1/3rd of an inch squares (I like thick cut canada bacon, and try to get the leanest one. We like fat, but not enough to kill you)
1 egg, as fresh as possible.


  1. Heat a pot of water to boil. Put a drop of oil in a ladle and spread around. Put you egg on the counter so its room temperature.
  2. Meanwhile, heat up your skillet to high. Wait several minutes so you know its sizzling hot (a drop of water should hiss and evaporate)
  3. Drop in the bacon and let cook in a single layer. Cook for about 3-5 minutes, so they're cooked through but not crispy yet.
  4. Turn heat down to medium, add garlic, and onions. Stir to deglaze the pan, pulling all the flavor from the bacon on the bottom of the pan.
  5. Add collard green stems, cook for two minutes before adding leaves. Try to push the greens to the bottom of the pan and layering the bacon garlic onion compote on top. Add salt and pepper to taste and reduce to low heat while you poach your egg.
  6. Crack the egg into the pre-oiled ladle. Hold it in the boiling water for about 5 minutes. Don't submerge it until the egg white starts to turn solidify. You'll lose some white but just make sure to not puncture the yolk. Cook as desired - I like my yolk thick but a little runny.
  7. Plate the greens and bacon into a little mound on the plate, creating a hollow in the middle for the egg to sit. Drain all the water from the ladle before separating out the egg. Drop egg carefully in center of collard green nest.

Enjoy!

Followers