Welcome to the Chic-Peas Kitchen!


We're two best friends, Kelly and Suanne, who love to cook! We have a passion for fresh food, complex flavors, and saving time. We'll share with you what's for dinner (really!) as well as how we made it and how we can make it better.

Jump in and learn with us!
Showing posts with label lunch. Show all posts

Wednesday, January 2, 2013

Cabbage Kielbasa Soup


I never buy the same groceries. I always scour the window ads and browse the weekly circular to see what is on sale and menu plan based on my good finds. While I know this idea may not work for everyone, for most dishes I can plan ingredients and recipes on the go. Today's soup was born out of two purchases I never have on my radar: cabbage and kielbasa. (I channeled my secret Polish grandma that I never had.) The outcome was so tasty, I would definitely make it again.


Cabbage Kielbasa Soup


1 medium white onion
1 stalk celery
1 carrot
1 pound beef kielbasa
1 red pepper
4 cloves garlic
1 16 oz can crushed tomatoes
1 head green cabbage (about 3 pounds)


  1. Prepare the onion, celery, carrot, kielbasa, and red pepper by dicing them into 1/2 inch cubes. Mince the garlic. Core and cut the cabbage into ribbons (1/4 inch by 1 1/2 inches).
  2. In a 4 quart stock pot (or larger) heat 2 tablespoons olive oil. Sautè the kielbasa, onion, and garlic. When the onions have softened, add the celery, carrot, and red pepper. Sautè until soft.
  3. On the side, boil a quart of water.
  4. Add the can of tomatoes to the kielbasa and vegetable mix. Add the cabbage and boiling water to cover and reach the consistency you like.
  5. Simmer for about 30 minutes. Season liberally with salt and pepper. A bay leaf, basil, oregano, or a little chili would be good too.


Serves an army.

Wednesday, November 7, 2012

Escarole, Sausage, and Split Pea Stew

It is 35 degrees in New York. My toes are cold, my humidifier is on high, and I have more layers on than an onion. Which means that it is time for SOUP! I pretty much exclusively live off of soup in the winter months and I have made more soups than is probably normal for someone my age. But I digress, I love soup and here is another recipe.

Escarole is a leafy green vegetable. I was first introduced to it in lentil soup, Progresso to be precise, which I ate with slices of whole wheat toast as a winter after school snack. I rediscovered it in my local supermarket and it tends to be on sale often. Its a bit temperamental as a vegetable - if you cook it even a tiny bit too long, it acquires a bitter aftertaste. So the key to this recipe really is simple: add the escarole at the very last minute.

The following recipe is a meld of two foods I enjoy - lentil soup and yellow daal (an Indian pea soup). It has a lot of meatiness in the sausage and chicken broth and requires very little seasoning.

Escarole, Sausage, and Split Pea Stew
Serves four, about an hour

1/2 pound (1 cup) of dried split yellow peas
1/2 pound of sausage (I used breakfast sausage, but italian is good too)
1 large onion, diced
1 large carrot, cut into coins
4 cloves garlic, smashed
1 can low sodium chicken broth
1 cup water
1 bay leaf
1 teaspoon curry powder
1 head escarole, sliced into 1/4 inch ribbons, no longer than 2 inches
5 leaves lettuce (Optional: if you have a small head of escarole or want to mellow the flavor)


  1. Boil three cups of water. Soak the dried split peas
  2. Prep all vegetables and remove the sausage from the casing
  3. Heat a stockpot on medium. When hot, add the sausage, crumbling into small pieces.
  4. When the sausage is mostly cooked through, add the onion, carrots, and garlic. Saute until onion is cooked through.
  5. Drain the split peas and rinse.
  6. Add the chicken broth, water, bay leaf, curry, and the split peas. Cover and simmer for 20 minutes, until lentils are cooked through and are soft.
  7. Add the escarole and lettuce and stir to incorporate. Cook for about 3 minutes and serve with crusty bread. 
  8. Can be served as a hearty side, a chunky stew, or pureed with more water as a creamy soup.

Monday, August 27, 2012

Japchae! Well, sort of. Korean inspired stir fried glass noodles

One of my favorite sides at Korean restaurants is Japchae. Its a cold or warm stir fry dish of sweet potato noodles and various veggies and sometimes beef. Its tasty, savory, filling, but not heavy, and full of healthy things.

However, I knew that making japchae (like making bimbimbap) requires many steps. All the vegetables are prepared one by one so that they retain the cleanest flavors. So with fair warning, this recipe does take some time. I think the results are totally worth it, but only if you're making 4+ servings.

The type of noodles used in japchae are also not easy to find unless you're around a specialty store. I cheated and used bean strings (mai fun) which is a thin rice noodle. The rice noodle also requires no boiling, just a soak and a quick fry in the pan. The results are similar enough where I would happily substitute mai fun in the future!

Recipe courtesy of Transparent Korean Language Blog.


Monday, August 20, 2012

Spicy Eggplant Tofu

After my two week vacation, I wanted to detox a little and get my eating habits back in order. I'm typically vegetarian 4 days out of 7 and I've definitely trying to pack lunches more often too.  I made a run to Chinatown and picked up some eggplant and tofu, among other things. I wanted something savory tasting, but not too heavy feeling, and this is what I got!

Spicy Eggplant with Silken Tofu 


1 block silken tofu
2 medium Chinese eggplant, in 1/3rd inch thick half moons
1 tablespoon sugar
1 yellow onion, chopped
2 large cloves garlic, minced
1 coin ginger, minced
1 large tomato, chopped
1 large pinch red chili flakes
1 star anise
1 teaspoon gochujang (Korean red pepper paste)
1 teaspoon cider vinegar
4 leaves basil
Optional: Cornstarch

  1. Drain water from silken tofu container. Turn tofu out of container and onto a plate. Cut the tofu into 1.5 inch cubes and spread out into a single layer, gently. Sprinkle with salt (you'll use about two teaspoons). Allow water to drain from tofu for about 30 minutes.
  2. Wash and cut the eggplant. In a bowl, toss with the sugar. 
  3. Prep the onion, garlic, ginger, and tomato. 
  4. Heat a large saute pan with two tablespoons of vegetable or olive oil.
  5. Pan fry the eggplant for 2-4 minutes on medium high heat.
  6. Add the onion, garlic, and ginger. Saute another 2-3 minutes, until fragrant.
  7. Add the tomato, star anise, chili flakes, gochujang, and  vinegar. Saute 2 minutes.
  8. Drain the tofu again. Add the tofu to the pan and fold in lightly, trying to maintain the shape of the tofu. 
  9. Reduce heat to medium. More water will drain from the tomato. Allow to simmer off until you have a thicker gravy. You can also cheat and make a cornstarch and water slurry to thicken it. 
  10. Serve over rice. 

Wednesday, June 6, 2012

Simmered Kabocha Pumpkin Squash

Kabocha was surprisingly on sale at the supermarket this week. Kabocha is a Japanese pumpkin or squash that has a firm, dense texture and sweet flavor. It is a common side dish to bento boxes and appetizers. I've even seen it used in desserts.

I tried to replicate the Japanese side dish a few times with butternut or calabeza squash, but they're both too watery and fine for the dish to work. Kabocha is so dense that it holds its texture super well.

I modified today's recipe from Lunch in a Box, who makes lots of really adorable bentos! I didn't have mirin or dashi on hand, but felt I could do without with a little genius. My kabocha came out super tasty.


Simmered Kabocha Pumpkin 
Makes 6 side dish servings

1 kabocha squash (about 2 lbs)
2 tablespoons brown sugar
3 cardamom pods
1 large pinch red chile flakes
2 tablespoons light soy sauce
2 squares konbu (seaweed) totaling 6 square inches
3 coins ginger
2 cups water


  1. Wash the kabocha, scrubbing lightly. The skin is edible, so it needs to be nice and dirt free.
  2. Take a sharp vegetable peeler and cut stripes of the skin off of the kabocha. By making sure each piece has a little flesh exposed on the bottom, we boost the flavor!
  3. Using a large, heavy knife, like a cleaver or chef's knife, carefully cut the kabocha in half. This is a little more difficult than cutting a watermelon open - it will have a good amount of resistance, so be patient and CAREFUL.
  4. Scoop out the seeds and the stringy bits. Discard.
  5. Cut the kabocha into 1-2 inch cubes. Try to be uniform!
  6. In a large bowl, pour in a cup and a half of water, the soy sauce, and all the spices and seaweed. Mix gently. 
  7. We need to cook the kabocha in a single layer. In a deep frying pan or pot, arrange the kabocha, skin side down in a single layer. I ran out of space and put some on top, but it meant I really had to make two batches.
  8. Pour the sugar/soy/water mix over the kabocha. Place over high heat. Cover with a pot lid that is smaller than the diameter of the frying pan, so that the lid pushes down on the squash and allows steam to escape from the sides (AKA a drop lid)
  9. When the liquid is at a roiling simmer, turn the heat down to a slow simmer. Cook for 20 minutes or until a fork goes easily through the squash. 
  10. You may have to remove some squash and rotate around the not as well cooked pieces.
  11. Drain the remaining liquid and reserve (would be tasty if you turn the leftovers into mashed sweet kabocha!). Allow kabocha to cool.
  12. Om nom nom.

Monday, April 23, 2012

Ricotta Zucchini Squash Pasta

Ricotta is a perfect summer sauce. Its cool and light compared to cream sauces and a little goes a long way to make a dish sing.

I julienned fresh early summer squash and red pepper with some fettucini. The vegetables lend well to the pasta and the fettucine held the sauce better than I expected. The leftovers tended to be a little mushy, but still tasty.


Ricotta Zucchini Pasta
Serves 6

1 pack fettucini
5 small zucchini squash
1 red pepper
1 tablespoon roasted garlic
1 pinch chili flakes
2 cups ricotta cheese
Fresh basil or cilantro (optional)

  1. Prepare pasta according to package. Cook al dente, as we'll be finishing it with the sauce. Drain and rinse with cold water to stop the cooking.
  2. Wash and slice the vegetables into julienne. Basically 2 to 3 inch long match stick sized. (Match the shape of your veggies to the type/size off your pasta. Elbow pasta would be matched with diced veggies for example)
  3. Heat a large pot with a tablespoon of olive oil. Turn the heat to low and add the garlic and chili flakes. Cook until fragrant.
  4. Add the vegetables and cook until wilted. Add the ricotta and mix to incorporate. Add salt to taste.
  5. Add the pasta and toss to coat.
  6. Serve and garnish with herbs of choice! Leftovers are good at room temperature or hot.

Tuesday, April 17, 2012

Egg Fried Silken Tofu

One of my favorite dishes at a local Malaysian restaurant is the "jia chang dou fu" or the "house special tofu." It is a silken tofu, fried, then topped with a pork and mushroom sauce. I really could have cared less about the sauce - the tofu was why I came! If I had known how easy it was to make, I definitely would have tried sooner! I modified my recipe from a Korean recipe for Tofu Fry or Dooboo Boochim.


Egg Fried Silken Tofu
Serves 4, 15 minutes

1 block silken tofu
2 eggs
1 scallion

  1. Open the tofu container and drain any excess water. Sprinkle salt over the top and then slice the tofu into pieces about 2 inch by 2 inch by 1 inch. Allow to sit and leech out more water for at least 30 minutes. 
  2. Scramble the eggs in a bowl.
  3. Heat a saute pan with 1/3rd of an inch of canola or vegetable oil. Allow to get very hot so that when you drop a bit of egg in, it fries and sizzles. Then reduce temperature to medium high so that you don't burn things too fast. 
  4. Using a spatula and chopsticks, lift out a section of tofu. Pat dry with a paper towel, taking care to wipe off excess salt and draw out more water. 
  5. Dip the tofu pieces in the egg, being careful to only put enough tofu in the bowl so each piece stays flat and unbroken. Coat evenly in egg, drain off excess egg, then place in pan to fry.
  6. Fry each side for about 2-3 minutes until golden brown. Then redip the tofu in egg and fry the other side. 
  7. When golden brown on all sides, remove from the pan and place on paper towels to drain the extra oil off. 
  8. Serve with scallions and soy sauce. Enjoy quickly - once the outside isn't crispy, its not as good.

Monday, April 25, 2011

Zucchini "Pasta"

Zucchini is a really versatile vegetable. I love its texture and its light sweetness and you can use it for practically anything. I've incorporated zucchini into stir fry, crudités (as in raw), tempura fried, as stuffing for peppers, and its often used in baking. The zucchini fruit is low in calories (approximately 15 food calories per 100 g fresh zucchini) and contains useful amounts of folate, potassium, manganese, and vitamin A. 


Zucchini pasta actually does not include ANY pasta. Instead, the zucchini is julienned into thin strips and cooked quickly so that the zucchini obtains the flexibility and texture of spaghetti. Technically, this is a more difficult dish - especially if you don't have a mandolin - and will require really good knife skills. Or, you can cheat and use a vegetable peeler. Note that the recipe can easily be made gluten free by omitting the homemade croutons.


Zucchini "Pasta"
Makes 2 side dish sized portions


1 zucchini
1 tomato
1/2 red onion (or 4 inches of leek for me)
Olive oil
1 mozzarella stick
2 slices white bread
Handful walnuts

  1. Prep ingredients. Mince garlic. Slice onion (leek) into thin strips. Julienne the zucchini into linguine sized strips. Dice tomatoes and a mozz stick. Dice bread (think croutons) and chop walnuts. To make the zucchini and leek uniform in size, take a vegetable peeler and make long even strokes. This way, you get even lengthwise slices, which you can slice into narrower strips on a cutting board. This works great with leeks, carrots, and other fibrous vegetable. This cannot be done with the onion, however, as they have too much water.
  2. Turn saute pan to medium heat. Add a teaspoon of butter. Toast bread and walnuts until crunchy and fragrant. Sprinkle with salt and oregano.
  3. Remove croutons and walnuts from pan, allow to cool on a plate lined with a paper towel. Try to avoid eating them all while cooking zucchini.
  4. In same pan, add a teaspoon and a half olive oil. Saute garlic and onion/leek. 
  5. Allow to cook until translucent, then add tomatos and zucchini. Cook until zucchini is soft. Immediately remove from heat and plate (the zucchini will continue to cook). Top with diced mozzarella, croutons, and walnuts.

Sunday, April 25, 2010

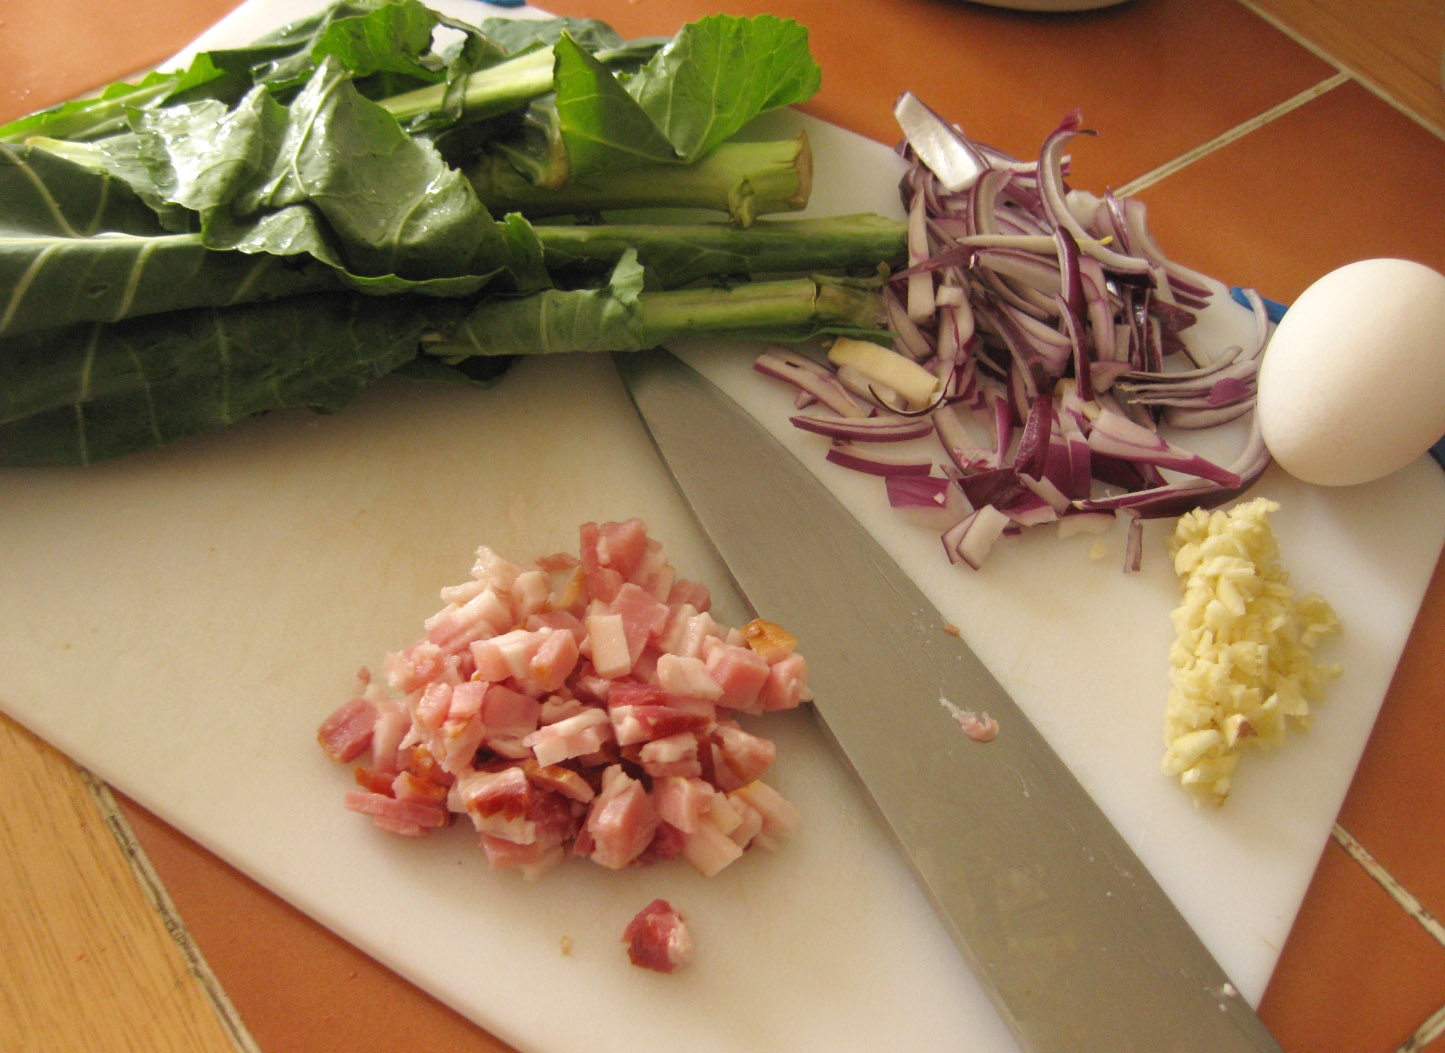
Brunching in Style: Poached Egg over Collard Greens with Bacon

Weekend mornings are special times. You wake up late and want something rich and decadent, not too much, but enough to last you until dinner. This is how brunch was made, my friends.

Today's brunch is rich and full of color. Its sure to impress if you had a midnight guest and will be filling enough to last you through the afternoon.

The collard greens can be replaced with spinach or green beans or practically anything. But the richness of the egg yolk and bacon complement the slight bitterness in leafy greens. The bacon renders a lot of fat so you should not need any oil (unless you replaced it with turkey bacon or ham).

Serve with toast triangles, a mimosa, and follow with coffee and a piece of chocolate.


Poached Egg over Collard Greens with Bacon
Serves one. 30 minutes

2 cloves garlic, minced
1/2 red onion, halved, then thinly sliced (julienned if you will)
5 big leaves collard greens. Separate leaves from stems. Leaves should be sliced in ribbons, stems diced. (It looks like a lot but it shrinks)
1 1/2 slices bacon, diced 1/3rd of an inch squares (I like thick cut canada bacon, and try to get the leanest one. We like fat, but not enough to kill you)
1 egg, as fresh as possible.


  1. Heat a pot of water to boil. Put a drop of oil in a ladle and spread around. Put you egg on the counter so its room temperature.
  2. Meanwhile, heat up your skillet to high. Wait several minutes so you know its sizzling hot (a drop of water should hiss and evaporate)
  3. Drop in the bacon and let cook in a single layer. Cook for about 3-5 minutes, so they're cooked through but not crispy yet.
  4. Turn heat down to medium, add garlic, and onions. Stir to deglaze the pan, pulling all the flavor from the bacon on the bottom of the pan.
  5. Add collard green stems, cook for two minutes before adding leaves. Try to push the greens to the bottom of the pan and layering the bacon garlic onion compote on top. Add salt and pepper to taste and reduce to low heat while you poach your egg.
  6. Crack the egg into the pre-oiled ladle. Hold it in the boiling water for about 5 minutes. Don't submerge it until the egg white starts to turn solidify. You'll lose some white but just make sure to not puncture the yolk. Cook as desired - I like my yolk thick but a little runny.
  7. Plate the greens and bacon into a little mound on the plate, creating a hollow in the middle for the egg to sit. Drain all the water from the ladle before separating out the egg. Drop egg carefully in center of collard green nest.

Enjoy!

Followers