Welcome to the Chic-Peas Kitchen!


We're two best friends, Kelly and Suanne, who love to cook! We have a passion for fresh food, complex flavors, and saving time. We'll share with you what's for dinner (really!) as well as how we made it and how we can make it better.

Jump in and learn with us!

Tuesday, October 26, 2010

(Ground) Turkey a l'Orange ... ¡En Fuego!


Man, life has been crazy lately! Poor Suanne is on a huge project at work and she has been working from sun-up to sun-down and then some! And I ... well, I'm nowhere near as busy as Suanne. Either way, neither of us have had much time to post anything, so on behalf on the Chic-Peas, I apologize. I know that all of you have just been waiting with bated breath for our next riveting installment, so here goes:

Tonight, I wanted something hearty, healthy, and ... what's an 'h' word for quick? I had a ton of produce in my fridge, so I decided to use at least some of it tonight. I served the finished product over a mildly sweet, sticky, coconut rice (which will most likely make its way into another post in the future) and garnished it with avocado.

**Disclaimer: I realize that this recipe bears no resemblance to duck a l'orange. The name is simply a nod to the mishmash of ingredients, but I am open to better suggestions. Feel free to leave them in the comments below!***

(Ground) Turkey a l'Orange ... ¡En Fuego!

Ingredients:
1 small onion, chopped
2 cups baby spinach, chopped
1/2 cup peanuts (optional, but I like the texture they provide.)
1 lb. ground turkey (you can also use ground beef)
1 tsp. kosher salt
1 to 2 tbs. of Sriracha hot sauce, depending on how spicy you like it (or how spicy you can handle!)
Approximately 1 cup orange juice (Approximately. Eyeball it! ... Also, I used OJ with a lot of pulp, in case you were wondering.)

1. In a large skillet, saute the onion and peanuts in a bit of oil until the onion is translucent. (If your peanuts turn translucent, you have a problem.)
2. Add spinach and let it cook down.
3. Add ground turkey and season with salt. Break up the turkey as it cooks.
4. When the turkey is almost finished cooking, add the Sriracha and stir well.
5. Add orange juice and simmer until it reduces by about half.

Makes about four servings.

You know, this would probably freeze well. I will get back to you about that ...

Wednesday, October 6, 2010

(Very!) Spicy Coffee Chicken Curry


I've had a lot of family functions lately, so it's been a while since I've cooked in my own kitchen. Tonight, however, I had an abundance of time and creativity (and some new coffee), so I decided to experiment with what was in my kitchen.

I started with just the spicy coffee-roasted chicken and I will definitely make it again. It is fantastic on its own. The coffee is actually a pretty subtle flavor; it's not overpowering at all. I see serving it maybe with some couscous and zucchini. Mmm!

But I've been craving Thai food lately, which became obvious as I cooked. I found a sort of curry evolving and I just ran with it. Mmmm!

Ingredients:
  • 2 chicken thighs (approx. 1/2 lbs.)
  • kosher salt
  • 2 tbs. Sriracha hot sauce
  • 1 tsp. cinnamon
  • 1/2 tsp. ground ginger
  • 1 cup strongly brewed coffee, room temperature
  • 1 clove of garlic, smashed
  • 1/4 cup of corn
  • 1/4 cup of peas (I don’t really like peas. I’ll probably use a different veggie next time.)
  • 1 tbs. lime juice (preferably freshly squeezed)
  • 3/4 cup coconut milk
  • 1/2 cup shredded coconut, unsweetened
  • 1 tsp. curry powder
  • 1/2 cup (approx.) udon noodles
  1. Preheat oven to 425 degrees Fahrenheit.
  2. Season the chicken with salt.
  3. Combine the Sriracha, cinnamon, and ginger. Generously rub into chicken and marinate for twenty minutes.
  4. Place chicken in a baking dish. Pour coffee over the top of the chicken to coat, letting it collect in the bottom. (Don’t submerse the chicken. The coffee should cover no more than the bottom 1/3 to 1/2 of the chicken.)
  5. Cover tightly with foil and bake for about forty-five minutes, or until internal temperature reaches 165 degrees Fahrenheit.
  6. Remove chicken to a plate and set aside to rest. (Reserve leftover coffee/chicken juice mixture.)
  7. Saute garlic in a splash of oil for a minute or so, then toss in corn and peas.
  8. Once veggies are hot, pour in the leftover coffee mixture and lime juice to deglaze the pan and let it reduce to about half.
  9. Shred chicken and add to pan.
  10. Add coconut milk, coconut, curry powder, and udon noodles and simmer until liquid thickens and noodles are hot.

Friday, October 1, 2010

Chicken Stew

When it gets cold, nothing makes me happier than hot food. Now you've seen my Chicken Stock and Tofu Stew, but I wanted to make something a little more traditional and Americana this time. Hence, Chicken Stew!


Chicken Stew (6-8 servings)
leftover chicken bones in your freezer (I had about 3 sandwich bags full)
3 chicken thighs/drums, skinless, and with the meat scored (aka cut parallel lines to the bone. Helps you to tear the meat off into edible chunks later)
1 large carrot, rough chopped (bite size chunks)
4 stalks celery (bite sized)
2 medium potatoes (bite sized)
1 onion, diced
2 garlic cloves
1 large bay leaf
6 cups boiling water
pepper
salt
oregano
cumin

  1.  Heat a large pot. Add olive oil and swirl to coat the bottom.
  2. Add the chicken bones and sear. When you start seeing "brown bits" on the bottom, deglaze with a few spoons of beer or wine.
  3. Add the chicken thighs and drums. Sear. Flip over and sear the other side. When things start to stick, add more beer and/or start adding onion.
  4. When the chicken is fully cooked on the outside, add all the vegetables. Celery leaves included. Scrape all the brown bits from the bottom of the pan. Add a teaspoon of salt, pepper, oregano, the garlic, bay leaves, and a pinch of cumin.
  5. Slowly pour in the boiling water. The water shouldn't be enough to cover all your ingredients - you're making stew, not soup.
  6. Bring back to a boil, then to a simmer. Monitor for 10 minutes and skim the scum from the top.
  7. Let simmer for 2-3 hours. Taste test for salt and how thick you would like the stew to be. As the veggies cook, they will thicken the soup.
  8. Grab your trusty chopsticks. Fish out all the bones and the bay leaves and discard. After two hours, the meat should fall right off the bone into shreds. 
  9. If your soup is not thick enough, mix a teaspoon of cornstarch with a tablespoon of water. Stir slowly into the soup stock.
  10. Serve! Great with crusty bread OR...


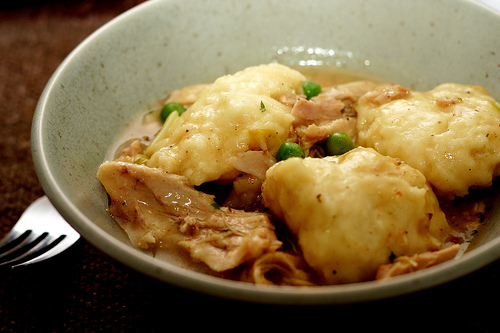
Chicken and Dumplings (aka day 2 of chicken stew)
for one serving

One pint Chicken Stew
1 teaspoon butter, melted
1/3 cup flour
1/6 cup milk
1/2 teaspoon baking powder
pinch of salt
pinch of oregano and/or basil flakes

  1. Reheat the chicken stew on medium heat. Check and see if there is enough liquid to create the consistency you like. I usually have to add a quarter cup of milk. Bring to a simmer
  2. Meanwhile, melt the butter in a bowl. 
  3. Add the flour, milk, baking powder, salt, and herbs
  4. Incorporate into a batter - should be goopy
  5. When the stew is simmering, give it a quick stir. Drop the batter into the stew one heaping teaspoon at a time. DO NOT STIR. Let the dumplings sit on top of the stew. 
  6. Cover the pot and let it simmer for 15 minutes. The steam of the stew will cook the dumplings.
  7. The dumplings are done when you insert a toothpick and it comes out clean. Carefully spoon out the stew and dumplings and enjoy!

Friday, September 17, 2010

Chicken Tenders

Suanne's fast food of choice is fried chicken (specifically nuggets at Wendy's! So this week, when Steve had extra chicken and Suanne had extra breadcrumbs, we decided to be evil and make our own!


Chicken Tenders

2 chicken breasts, cut horizontally into strips
1.5 cups of breadcrumbs
3 or 4 eggs
seasonings! 
2 cups corn or veggie oil for frying (optional - baking is better)

  1. Prep the chicken
  2. Put the breadcrumbs in a bowl. Add dry seasonings as you like. Maybe a teaspoon of curry, or paprika. Maybe rosemary and thyme. How about garlic pepper? Have some fun with it! Plain is cool too. 
  3. Crack the eggs into a bowl. If you have it, add a few tablespoons of milk. Mix well!
  4. Heat the oil in a pan on medium high heat - be careful since frying creates a lot of smoke. We only used about 2 cups so the oil would come up halfway a piece of chicken.
  5. Dip the chicken into the egg, then into the breadcrumbs. Place the chicken off to the side as you continue dipping your strips.
  6. When the oil is shimmery, and a drop of egg in the oil sizzles, the oil is ready. Take the chicken tender and dip it once more into the egg, then into the oil.
  7. Fry until dark golden brown, then flip so the other side cooks too.
  8. Remove from the oil and place on a paper towel lined plate.
  9. Mix up some spicy ketchup and enjoy!

Tuesday, September 14, 2010

Basic Fried Rice

Every Chinese kid has nostalgic memories of their mom/grandma/aunt/dad/etc making fried rice. Fried Rice is a staple of Chinese food. Its also a great way to utilize tons of extra rice and food you have into a convenient meal! And as complicated as it may look, its actually super super easy.

Fried rice, in my humble opinion, should always contain the following:
- Something fatty (bacon for me, lap cheung for my mom, spam for Perry)
- Something crunchy (celery, shrimp, carrots, or onion)
- Egg - the creamy protein draws the rice together
- Soy sauce. The rice really needs a good slosh of it to bring out the color people expect of fried rice, but more importantly, to bring out all the flavors of the ingredients. Carbs always need a lot of salt.


Suanne's Fried Rice 
Serves 3-4, all ingredients (minus rice) are optional and exchangeable. Took me about 45 min.

1/4 cup of pre-diced bacon (probably amounted to 3 strips of bacon)
1 red pepper, diced
2 stalks celery, diced
big handful of frozen spinach (chopped, not whole leaf. defrosting is good, but not 100% necessary)
3 cloves garlic, minced
2 eggs, beaten
8 oz diced chicken, pre marinated (optional)
3.5 cups of already cooked, been-sitting-in-the-fridge-too-long, dry rice
2 scallions, diced
1-2 tablespoons of soy sauce - you'll need more than you think
dash of sriracha (why not?)

  1. Heat a large wok (or in my case, a stainless steel pot) until hot. Take the bacon and saute until almost crispy and dark red.
  2. If you have extra meat, add here. If you need extra oil, please add it.
  3. Add celery, red pepper, and the spinach. Hm. Tomato paste would be good too... Saute and scrape the brown bits from the bottom of the pot. 
  4. Add the garlic and an extra drizzle of oil - olive or canola. The next steps will make a lot of stuff stick to your pan - you're hereby warned.
  5. Add the rice. Break up the large chunks with a spatula, but don't crush the rice. You want the grains to stay whole. Fry with the existing veggies and such, but keep the rice moving - if you let it sit it will stick to the bottom!
  6. When the rice is dry and fully incorporated with the veggie mix, pour the eggs over the rice. Again, keep mixing - eggs will stick to the bottom of the pan too!
  7. As the egg cooks, add the scallions, soy sauce, sriracha, and any other flavorings (I added a pinch of curry). 
  8. Turn the heat off the pot. When the egg is fully cooked (you may not even see it since the rice soaks it up) serve.
  9. Enjoy!

Saturday, September 11, 2010

Tropical Paradise Muffins, or Kelly's Fruity Muffins


It's finally fall! I love fall - the beautiful, cool weather; the changing leaves; the hearty foods! And of course, now that the weather's cooling off, it means a lot more baking.

I woke up this morning and wanted something sweet. I thought about pancakes, but they can be so cliche. So, as I surveyed my kitchen (and found an overabundance of fruit), these muffins sort of materialized in my head.

They're a perfect transition from summer to fall: they take the tropical flavors of summer and marry them into a very dense, sticky, baked treasure of delectable yumminess. Mmmm!

Ingredients:
1 1/3 cups cubed watermelon (all seeds removed!)
1/3 cup of strawberry-banana juice
2.5 ripe bananas

1 1/2 cups flour
1 tsp. baking soda
1/4 cup sugar
1/2 cup brown sugar
2 heaping tbs. apple sauce
3/4 cup shredded coconut, unsweetened
1/2 cup oatmeal

  1. Preheat oven to 375 degrees Fahrenheit.
  2. Grease muffin tin. (I used muffin liners, but they stuck to the muffins big time. Therefore, I highly suggest greasing your pan instead!)
  3. In a large bowl, combine flour, baking soda, sugars, and applesauce.
  4. In a blender, puree watermelon, juice, and bananas.
  5. Add half of the puree to the flour mixture and blend well, making sure to scrape down the sides. Repeat with second half of puree.
  6. Fold in coconut and oatmeal.
  7. Pour into muffin tin and bake until top is dark golden brown and springs back when pushed. You can also use the toothpick test - insert a toothpick and if it comes out clean, the muffins are done! **Note: This batter doesn't rise very much, to fill your pans almost to the top.
Yields approximately ten to twelve muffins.

Friday, July 30, 2010

Spinach and Mushroom Cream Pasta

Some days, I just want something decadent. And while this goes against the grain of my usual eating habits, some days a girl has got to have her carb fix! And like a true Chic-Pea recipe, this one is good enough that you'll be begging for leftovers.


Spinach and Mushroom Cream Pasta
Serves 4 to 6, takes about 45 minutes

1 pack of pasta (we used a sleeve of spaghetti in the photo, but comparable to a pack of shells)
1/3 lb bacon, diced (use a non-serrated knife and make sure its really sharp or it will take you forever)
1 lb frozen chopped spinach
1 lb mushrooms, diced
4 cloves garlic, minced
1 cup half and half
1/2 pack of shredded mozzarella (or 3 string cheese sticks!)
tsp oregano
basil if you have it
pepper and salt to taste (you shouldn't need much salt.)

  1. Set your pasta to boil in salt water. I like shells or ziti for this recipe because everything ends up being the same size, but the picture uses spaghetti so its versatile. Once the water boils, cook for 6-8 minutes until al dente (cooked right through but not squishy. it should still have some chew to it). Rinse under cold water and drain.
  2. Heat a large skillet. When hot, cook bacon until it renders all its fat, is a dark pink, and a smidge crispy. 
  3. Add the garlic and saute in the bacon oil. 
  4. When the garlic is fragrant, add mushrooms. If the mushrooms aren't cooking well because the pan is too dry, add a quarter cup of the half and half and turn the heat down to low. Make sure you scrape the yummy brown bacon bits off the bottom of the pan - that is the real flavoring to your sauce!
  5. When most of the mushrooms have cooked, add the spinach. The mushrooms and spinach will give off a lot of water. 
  6. Add the remaining half and half. The contents of the sauce should be level with the amount of liquid. If you don't have enough, add milk or water.
  7. Cook on low for another 5-10 minutes to incorporate the flavors. 
  8. Just before serving, add two handfuls of the shredded mozzarella to the sauce and mix. This will thicken the sauce and give it an added boost of creaminess.
  9. If you have ziti or shells, add to the sauce and mix thoroughly to incorporate the "chunky" bits of the sauce with the pasta. If you have long noodles, serve the sauce over the already plated noodles.
  10. Enjoy!

Thursday, July 22, 2010

Steve's Raspberry Pomegranate Pork Chops

I have this unique problem for a 24 year old - I can't drink my weight. Ever. I am a lost soul, founded in Prohibition and wandering around Vegas, where alcohol is more plentiful than water.

So my friend Steve and I had some extra Raspberry Pomegranate wine coolers. They've been sitting in his fridge for a while. So I decided to make them a key ingredient for today's dinner.


Steve's Raspberry Pomegranate Pork Chops (for four pork chops)
1/2 a wine cooler (we had Bartles & Jaymes Raspberry Pomegranate)
1/4 a cup soy sauce
2 garlic cloves, minced
tablespoon Sriracha hot sauce
tablespoon cornstarch
1/2 teaspoon sesame oil

  1. Pound the pork chops to tenderize them a bit.
  2. Mix all ingredients, cornstarch last.
  3. Coat the chops evenly. Leave in marinade for 15-30 minutes in the fridge. 
  4. Heat your skillet with about a tablespoon of oil. Wait until your pan is nice and hot and the oil is shimmery.
  5. place porkchops in pan, bone side toward the center. Cook about 3-4 minutes. When one side is cooked, flip to the other side. Cook another 3-4 minutes, remove from pan.
  6. Boil remainder of marinade as sauce for about 5 minutes. Pour over chops.
  7. Serve! (or cook your veggies in the pan next :)

Wednesday, July 21, 2010

Summer Mango Chicken


Today I staggered home through the heat and humidity of NYC. I knew I had nothing in my fridge. I knew I didn’t really want to cook – its too hot, and I don’t have air conditioning. But I did know that I bought my two other meals of the day, and spending money on the third was just plain irresponsible of me. So I inventoried the fridge:

Frozen chicken (diced)
Ripe mangos
Cilantro (left over from guacamole)
Red onions – already half gone
Garlic

And Voila! A meal!


1.    Season frozen chicken with a teaspoon and a half soy sauce, a generous pinch of cinnamon and cayenne, a teeny pinch of cumin, and a tablespoon of cooking wine. Maybe a drizzle of sesame oil too.
2.    Cube the mango. Mangos are oval and usually wider one way. The width is determined by the big skinny pit inside. Slice just above the center (hopefully skimming right by the pit) on either side. Take the halves and use your knife to score lines horizontally and vertically into bite size cubes, but don’t go thru the skin. Invert the mango skin so the fruit pops out – scoop it out with a spoon or cut it free with your knife.
3.    Chop your onion into similarly sized bite cubes. Mince the cilantro and garlic.
4.    When the chicken is defrosted, heat up your pan with a teaspoon of oil. Swirl the pan so it is coated evenly.
5.    Toss in the garlic. Cook until fragrant.
6.    Add chicken and marinade. Wait a minute or two (when the chicken is cooked at least on one side) and add onions. Cook until onions are mostly transparent.
7.    Add the cilantro and mangos. The riper the mango, the less you need to cook it. If you mango is super ripe, don’t cook it at all. Cook on medium heat for about a minute, maybe two, until the cilantro is incorporated and the mango and onion have picked up all the yummy chicken bits on the bottom of the pan. Do not cook any longer than this or you’ll end up with mango puree!
8.    Serve! Goes well with rice and beans.

Fruit Salad --> Fruit Parfait

I loooooooooooooove LOVE loooove summer. Not just because it warm out, or the leisurely way everyone goes about their lives. But because of the FRUIT. When you walk around parks with the farmer's markets, the fruits call to you, screaming, "EAT ME!" They tempt you as you peruse by with their scented nectar, pulling you in with their perfume. The berries, the peaches, the pineapples and melons. And they seem to get me every time.

And then Suanne has a treasure trove of fruit. In a one-person household -____-;;

Now Kelly will tell you she freezes her fruit. Suanne will tell you its a crime of nature not to eat them now. hahaha. So I make fruit salad!

My most recent fruit salad included strawberries, peaches, apple, and orange segments plus zest. Let me tell you how to segment an orange - otherwise called supremes.

You can watch chef Ming (and his always color coordinated dish towels to his shirts) supreme an orange here:


Technique: How to Supreme Citrus Fruit
  1. Get a SHARP knife. This will not work with a butter knife. If you need zest, zest the fruit first.
  2. Take your orange/lemon/lime/grapefruit/pomelo and slice off a bit from the top and bottom. (aka the part where the stem was). You want to cut enough so that you slice through the pith (the white squishy part) and can see the fruit.
  3. Stand the fruit on the sliced edge.
  4. Slice the fruit from the top, cutting with the curve of the fruit, separating the pith/skin from the fruit. This will make orange juice on your cutting board, so make sure you have a good hold on the fruit. Take your time.
  5. Continue to slice all the pith and skin from the fruit so you have a globe of solid orange/lemon/whatever.
  6. When you look at the fruit, you should see the longitudinal lines (vertical) that separate the segments. Cut just a smidge to the left and right of these lines and wiggle the supreme out. Now you have yummy fruit, with no pith or membranes! Isn't that faster than peeling?
  7. Take the leftover membrane after you've removed all the segments, and give it a good squeeze. Reserve if you need some of the juice :)

And now for the parfait! When you have too much fruit salad, or just want to dress it up, grab some yogurt and you have a very impressive breakfast or light dessert.


Summer Fruit Parfait
Serves four large portions or six smaller ones

Two peaches
1 apple (granny smith or fuji)
1 orange
pint of strawberries
honey
plain or vanilla yogurt
sliced nuts (almonds for me)

  1. Wash and dry your fruit.
  2. Get rid of leaves, pits, and not so yummy parts of the fruit, like bruises
  3. Zest and supreme the orange (no juice!! just the supremes and zest!)
  4. Slice your fruit into 1/2 inch cubes. (the smaller the cubes, the prettier the parfait. Bigger cubes are great for just salad)
  5. Toss in a big bowl!
  6. Squirt a teaspoon of honey over the top, mix well. (if you just want salad stop here)
  7. Grab 4 or 6 wine glasses
  8. Add 3/4 an inch of fruit.
  9. Add a layer of yogurt. Add a layer of fruit, yogurt, etc until you hit the top
  10. Top with yogurt and the nuts.
  11. Serve within 30 min. Salad is good for about 24 hours, then it gets kinda soppy.
  12. ENJOY!

Sunday, June 20, 2010

Guacamole Ole!

I make a DARN good guac. I made a big bowl of it once for my friend Steve and Perry. It lasted about 15 minutes. They forgot to share so I only got two bites of it!

The secret to good guacamole is ripe avocados. I pick Haas avocados, but the general rule for any avocado is this - pick one that has a little give. When you hold it in your palm and give it a gentle squeeze it should be a little soft. Think about the firmness of a ripe peach. It should NOT be hard. Avoid ones with bruises (aka spots where they got banged up and are a little too squishy in that area). When you slice into it, it should have the same give as room temperature butter. (See http://simplyrecipes.com/recipes/how_to_cut_and_peel_an_avocado/ for how to halve, seed, and cut your avocados).

The guacamole can be made as hot, sharp, or as green as you like it. Feel free to experiment!


Guacamole
Serves 4 as a snack, or two ravenous men.

2 ripe avocados, cut into 1/2 inch cubes
1/2 of a small sweet red pepper, minced (aka fine dice)
1/2 small red onion, minced very fine
1/2 jalapeno, minced very fine (your fingers may tingle after this so if you're sensitive, wear gloves)
1 clove garlic, minced very fine or paste (see: http://www.cuisineathome.com/main/videos/57-garlicpaste.php)
6 springs cilantro (as in individual thin stems, not 6 cilantro plants with the roots), minced
1/2 lime
salt and pepper to taste

  1. Prep all ingredients as directed above
  2. Get a large bowl.
  3. Combine the red pepper, red onion, jalapeno, and garlic.
  4. Add the avocado. Mash some of the avocado to create a finer paste, but leave some intact for texture. As you mash, mix with other ingredients.
  5. Stir in cilantro
  6. Squeeze the lime juice over the guacamole and stir to incorporate. The citric acid in the lime keeps the avocado from oxidizing and turning brown as well as brightens up the flavor. I use almost a whole 1/2 lime, but add little by little to make sure it suits your taste.
  7. Add salt and pepper to taste. If serving with chips, keep in mind those are already salted!
Espero que lo disfrutas!

Tuesday, June 1, 2010

Rosemary Mashed Potatoes


Okay, I know that this is my second post today, but there is a method to my madness! After making the delicious meatloaf the other day, I decided that it was lacking potatoes. But what kind of potatoes?

Roasted? Eh.
Fried? Bleh.
Mashed? Aha!

On my way home from work, I stopped at my local Indian grocery store (Thanks for the tip, Suanne!) and picked up some red potatoes. Then I headed home to create my luscious masterpiece! (Do I over-hype my food a bit? I'm beginning to think so ...)

Anyway, once the potatoes were finished, I crumbled some of my leftover meatloaf in the bottom of a mini-casserole dish, then covered it with a layer of mashed potatoes and baked my impromptu shepherd's pie in a 400-degree oven until it developed a light, golden-brown crust. Delicious!

**Shout-outs: This recipe is born out of a variety of tips I've picked up from tons of sources over a number of years. The ones I can remember are Wolfgang Puck, Alton Brown, and, of course, my awesome mom.

Rosemary Mashed Potatoes
- 1/2 pound of red potatoes, roughly chopped
- 3 tbs. butter
- 2 cloves garlic, minced
- Approx. 1/4 cup green onions, chopped (Keep the dark green and and the light green, separated. Discard the white parts.)
- Approx. 1/4 cup heavy cream (Guesstimate it!)
- 1 tbs. rosemary
- 1 tbs. basil
- Salt and pepper, to taste

1. In a larger pot than you think is necessary, boil enough water to cover the potatoes. Add the potatoes and cover. While those cook ...
2. In a small saucepan over very low heat, melt the butter and sauté the garlic and light green onions until tender.
3. Add the heavy cream, rosemary, and basil. Bring to a low simmer.
4. Add salt and pepper to taste. Remove from heat.
5. Meanwhile, your potatoes should be about ready. You want to get them out of the water just as they start to get mushy. They should still be a little firm, but should mash when you press a fork down on one. Don't wait until they're soggy - that's too long!
6. Drain the potatoes into a colander and shake to remove excess water. Then, immediately return them to the still-hot pot. This will help to evaporate any leftover moisture.
7. Add about half of the warm cream and either whip or mash the potato mixture. Slowly add more of the cream until the proper consistency is reached. (You may not use all of the cream.)
8. You may need to add more salt, to taste. Your call.
9. Top with a sprinkling of the dark green onions.

Mmmm!

Mmmm ... Mmmm ... Meatloaf!

So, I haven't posted much lately - sorry to my co-author and all of our soon-to-be fans!

But fear not, my friends, for I bring you a new take on an old favorite (or not-so-favorite)! I've taken what can be a tired, boring, bland meal and turned it into a juicy, satisfying, filling comfort food.

It takes a little bit of work, but it freezes and reheats well. (I'm all for anything that freezes well: homemade food is so much better than TV dinners. Bleh!)

And now, without further ado, I give you one of the best meatloaves you'll ever taste!


Mmmm ... Mmmm ... Meatloaf
- 1 red onion, roughly chopped
- 3 cloves of garlic, minced
- 1/4 cup of carrots, diced
- 1/4 cup of celery, diced
- A splash of red wine (Either regular wine or cooking wine is fine.)
- 1/4 cup of green onion, chopped
- a handful of baby spinach
- 1/2 pound of ground turkey
- 1/4 cup pumpernickel crumbs (You can use any type of bread, but I like the flavor of pumpernickel. Also, bread that's more stale than fresh works better. Trust me.)
- 1 egg
- A few dashes of Worcestershire sauce
- 1.5 tsp. cumin
- 1/2 tsp. coriander

1. Preheat oven to 350 degrees Fahrenheit.
2. Sauté the red onion, garlic, carrots and celery in a small amount of olive oil until they are tender.
3. Deglaze the pan with the red wine and let it reduce a bit.
4. Add the green onion and spinach. Cook until the spinach wilts. Remove from heat.
5. In a large bowl, mix the rest of the ingredients with the veggies and another splash or two of red wine. (Use your hands - it's the best way to mix it! Just be sure to wash them well both before and after.)
6. Press the mixture into a loaf pan and cover with foil.
7. Bake for 30 minutes, then remove foil and bake until a thermometer inserted into the center of the loaf registers 165 degrees Fahrenheit (about 15 to 20 minutes). There should be a nice crust on the top.
8. Once the meatloaf is cooked, remove from oven and let sit for at least ten minutes before cutting. (If you cut it immediately, all the juices will leak and the loaf will become dry!)
9. Enjoy!

Monday, May 24, 2010

Perry's Kung Fu (Kung Pao) Chicken Stir-Fry

Perry, my silent and deadly significant other, is very fond of his mom's Kung Pao Chicken. And like all ninja-girlfriends, I need to learn how to make his favorite foods so I can win his way to his heart through his stomach to fuel his iron fists.

Kung pao chicken is diced chicken with chili peppers and cashew nuts. Its pretty healthy and packs a good punch in the spice department! This version adds a serving of vegetables and a pinch of sugar. Serve over a bowl of fresh rice with a side dish of veggies.

Perry's Kung Fu Chicken
Serves two - about 15 or 20 minutes

Two chicken thighs or breasts, diced approximately into 1/2 cubes
3 tsp cooking wine
2 tbsp soy sauce
dash sriracha (because i feel like it, ok?)
2 tsp sugar
dash sesame oil
1 tsp cornstarch
two cloves garlic, smashed
one thin coin ginger
one large red pepper, diced into 1/2 cubes
1/2 tsp chili paste (adjustable)
one jalapeno, minced, no ribs or seeds if you're sensitive to spicy
one large scallion, sliced thinly
1/2 cup cashew halves, unsalted. (if you have salted, its fine but cut down the salt/soy sauce in the recipe)

  1. Put the diced chicken in a large bowl. 
  2. In another bowl, combine cooking wine, soy sauce, sriracha, sugar, and sesame oil. Stir well and then add the cornstarch pinch by pinch. Mix well until you have the consistency of a sauce (aka, you dip a spoon in and the marinade sticks to the spoon so that when you draw a line with your finger in the back of the spoon, it still shows after a few seconds).
  3. Pour marinade over chicken and mix well immediately. You should not have a lot of marinade puddling in the bottom of the bowl - the marinade should be thick enough to coat the chicken so its not sitting in tons of marinade. Marinate for about 10 minutes.
  4. In the meantime smash the garlic, cut the ginger, dice the onion and pepper. Wash and cook the rice.
  5. Heat a wok or skillet on HIGH heat. Add a tablespoon of oil. Stir fry is awesome because things cook fast, and to cook fast you need a lot of heat. 
  6. When the pan is hot (you see waves of heat off it or a drop of water spits and evaporates) toss the ginger in and fry for 20 seconds. Add the garlic and fry for a bit to season the oil. Add the jalapenos. 
  7. When fragrant, add the chicken. Spread chicken out in pan in a single layer (up the walls of the wok). When the chicken is cooked and browned on one side, act fast and stir everything together, flipping the chicken over.
  8. When the chicken is all cooked on the outside, add the red peppers and chili paste. Toss until cooked. 
  9. If you have a lot of water accumulating at the bottom of your pan, you can do one of two things: 1- keep cooking on medium heat until the water evaporates or 2 - make a cornstarch slurry. 1/2 tsp cornstarch plus tsp of water mixed WELL. Pour little by little into the puddle of water in the pan and mix thoroughly with contents. Only use as much as you need or it will taste starchy! (this is similar to a roux).
  10. Taste. Season. Add more chili paste or sriracha if its not as hot as you like. Make sure everything is cooked. Then add the scallion and toss. They don't need long to cook.
  11. Right before serving, add the cashews and mix in. The cashews are meant to be crunchy and if left in the dish too long,will get soggy after an hour. If you are planning for leftovers, don't add cashews to the leftover portion - add the cashews always right before eating.
Enjoy!

Tuesday, May 4, 2010

Secrets to Tender Chicken: Simple Stir Fry

Its 9 pm - I walk in after a long day and want something hot and filling but will get me in bed sooner rather than later. Stir fry fits the bill exactly. My mom always said the secret to good stir fry (other than good ingredients) is cornstarch. Say wha?

Lets talk to about.com: "The starch binds together the liquid ingredients in the marinade and seals them to the meat, poultry or seafood being marinated.  This technique is particularly important in quick cooking stir-fry dishes as it helps give the food more flavor. When a Chinese recipe calls for cornstarch in the marinade, always add it last unless the recipe specifically calls for blending it with the other ingredients before adding it to the food being marinated."


Easy Chicken Stir Fry
serves one, 10 minutes

4oz chicken, diced, room temperature
splash of soy sauce, cooking wine/beer
pinch of cayenne, cumin
1/2 tsp cornstarch
5oz of your favorite veggie (green beans for me!)
1 clove garlic, smashed


  1. Take the chicken and toss in a bowl. Add soy sauce, cooking wine, and spices. Mix thoroughly and add cornstarch. Mix well again and set aside.
  2. Heat oil in your skillet, wok, saucepan, whatever. Wait until its REALLY hot. Then toss in the garlic and you'll hear it sizzle. 
  3. When the garlic is browned and fragrant, add chicken. let it brown and cook thoroughly on one side first so that when you go to stir it, it should unstick by itself . Then cook the other sides.
  4. Add the veggies after the chicken is opaque on all sides. If things are starting to stick too much, the veggies will release some water to "deglaze" the pan and keep things from burning. But if the veggies aren't enough, add a few teaspoons of cooking wine or water. Cover veggies and let cook for  a few minutes until they're bright green (assuming the veggies are green to begin with)
  5. Stir and make sure everything is cooked through. Serve!

Monday, May 3, 2010

Breakfast of Champions: Fiesty Frittata

Frittata is an egg-based dish similar to an omelette or quiche, either simple or enriched with additional ingredients such as meats, cheeses, vegetables or pasta. It may be flavored with herbs.


When I had a 1.5 hour commute last summer, I had to leave the house by 7:15 am to get into the city on time. Getting up extra early means you run out of steam much earlier than lunchtime and you ed up regretting not eating something before hopping in the car! That's where this super frittata comes in - its like a protein brownie, filled with all my favorite things and sealed together with an egg. You can replace the ingredients for anything you like, so feel free to wing it. But DO have everything chopped and prepped before you turn the skillet onto the stove - trust me, there isn't enough time to chop or wash in between.

You will need one special tool - a non-stick oven safe skillet or saucepan with 2 inch (at least) tall sides. And a spatula that won't scratch up the pan!

Feisty Frittata
one hour - includes ALL prep and 20 minutes of baking
One nine inch skillet = 6 large breakfast portions


1 small onion, diced.
3 italian sausages. Squeeze the meat from the casing so you get ground sausage.
3 cloves garlic, minced

2 cups frozen spinach, microwaved and pressed out so there's no extra water
1.5 cups diced mushrooms (1/2 inch cubes)
1 tsp tomato paste
1 cup cheese

6 large eggs (8 small ones) , cracked in a large bowl and beaten (ie for scrambled)
1/2 cup milk
1/2 tsp each salt and pepper
1/2 tsp sriracha - optional
1 tbsp freshly minced parsley


  1. Prep all your ingredients. Everything must be chopped, minced, squeezed and cracked before moving on. This takes the longest, but I guarantee its worth it!
  2. Preheat your oven to 350 degrees.
  3. Heat up your skillet on high. Add 1 tbsp of oil (canola in my case) and coat the pan AND the sides generously. everything goes in this pan and you do not want to be scraping egg off the pan at the end of the meal! Don't skimp here.
  4. When the pan and oil are hot, add the sausage. Use the spatula and a spoon or something to break the sausage up so it crumbles like ground beef. This takes work. If you use bacon or diced chicken, its not as bad, but make sure the pieces are tiny - 1/2 inch cubes are good.
  5. The sausage will take a while to cook through and things will start to stick. Add the onions and garlic here to deglaze the pan while you keep working at cooking the sausage through.
  6. When sausage is cooked mostly through (no visible pink) add the mushrooms and spinach. Make sure the spinach is as dry as possible! Mushrooms and spinach give off a lot of water and you have to cook off all the water before adding the egg.
  7. Add the tomato paste, salt, pepper, and hot sauce (if applicable). Keep cooking off more water. The contents of the pan will significantly diminish as the water evaporates. Lower heat to medium.
  8. While you're cooking off water, beat the eggs in a large bowl and then add the milk. The milk helps make eggs fluffy! And we like fluffy :)
  9. When you've cooked off all the water (the bottom of the pan should appear dry) you can mix in the cheese and parsley slowly, one handful at a time. Check the amount of stuff in the pan. The pan should be no more than 50% full (to the rim of the pan.) If you have more than that, scoop it out and serve that over rice or something. Scrape down the stuff from the edge of the pan to the bottom. If you leave stuff on the sides of the pan, it may burn when you bake the frittata.
  10. Pour the egg-milk mixture over the sausage-spinach mix. The egg will fill the spaces between the mixture. Do not fill the pan past 75% up the side of the skillet! (The egg will rise cuz they're fluffy). Mix the contents of the pan gently - you don't want all the yummy stuff to be on the bottom of the pan, you want it to be incorporated throughout. Help some of the stuff get suspended in the egg. Let this cook on medium for about five minutes and make sure your oven has reached 350.
  11. Pop the whole thing in the oven on the middle rack. If you don't have a oven-safe skillet, you can make everything in the pan first, transfer the stuff to a baking pan, and then top with the egg mix. Cook for 20 minutes until top is slightly browned and the whole frittata is cooked solid. Let the frittata rest for at least 5 minutes before serving.
  12. Cut with a spatula that won't hurt your pan. Serve warm or cold, with a side of bread or salad.

Friday, April 30, 2010

Eggs to go!

I recently started a new project that transferred me to work in another office. It adds 30 minutes to my commute every day and they're a little stricter about being timely and hitting the ground running. AKA for me, no shredded wheat and yogurt at my desk at 9:30 am - I need to eat before I get there. (Getting up EXTRA early? Super bummer.)

As you may have figured out by now, I'm a big fan of poached eggs. Eggs make perfect breakfast foods because they are single small servings that are packed with protien that will keep you running through the day. I made a serving of bacon kale last night for this morning and splurged on buying turkish pide bread I found at my supermarket. But I wanted to have my egg and eat it too!

The microwave-engineers-that-be are one step ahead of me! http://www.whatscookingamerica.net/eggs/microwaveeggs.htm

Microwave poached egg

Grab a mug and fill with half a cup water. Mugs are perfect because they're deep and will make your egg the perfect circle!
Grab a fresh egg. Crack the egg and gently ease it in the mug. The egg will fall to the bottom. If the yolk is still whole, poke it with a fork. (The yolk can explode).
Cover the mug with plastic wrap.
Cook the egg on full power for 1.5 to 2 minutes.
If you're doing this for the first time, better to overcook when in doubt. If the egg doesn't looked completely done, let it sit in the water for another half minute and make sure the egg white is solid. (Mine took 2.25 min but I was also running the toaster for my pide!)
Pour out excess water slowly over a slotted spoon. Serve with a pinch of salt and pepper

Sunday, April 25, 2010

Brunching in Style: Poached Egg over Collard Greens with Bacon

Weekend mornings are special times. You wake up late and want something rich and decadent, not too much, but enough to last you until dinner. This is how brunch was made, my friends.

Today's brunch is rich and full of color. Its sure to impress if you had a midnight guest and will be filling enough to last you through the afternoon.

The collard greens can be replaced with spinach or green beans or practically anything. But the richness of the egg yolk and bacon complement the slight bitterness in leafy greens. The bacon renders a lot of fat so you should not need any oil (unless you replaced it with turkey bacon or ham).

Serve with toast triangles, a mimosa, and follow with coffee and a piece of chocolate.


Poached Egg over Collard Greens with Bacon
Serves one. 30 minutes

2 cloves garlic, minced
1/2 red onion, halved, then thinly sliced (julienned if you will)
5 big leaves collard greens. Separate leaves from stems. Leaves should be sliced in ribbons, stems diced. (It looks like a lot but it shrinks)
1 1/2 slices bacon, diced 1/3rd of an inch squares (I like thick cut canada bacon, and try to get the leanest one. We like fat, but not enough to kill you)
1 egg, as fresh as possible.


  1. Heat a pot of water to boil. Put a drop of oil in a ladle and spread around. Put you egg on the counter so its room temperature.
  2. Meanwhile, heat up your skillet to high. Wait several minutes so you know its sizzling hot (a drop of water should hiss and evaporate)
  3. Drop in the bacon and let cook in a single layer. Cook for about 3-5 minutes, so they're cooked through but not crispy yet.
  4. Turn heat down to medium, add garlic, and onions. Stir to deglaze the pan, pulling all the flavor from the bacon on the bottom of the pan.
  5. Add collard green stems, cook for two minutes before adding leaves. Try to push the greens to the bottom of the pan and layering the bacon garlic onion compote on top. Add salt and pepper to taste and reduce to low heat while you poach your egg.
  6. Crack the egg into the pre-oiled ladle. Hold it in the boiling water for about 5 minutes. Don't submerge it until the egg white starts to turn solidify. You'll lose some white but just make sure to not puncture the yolk. Cook as desired - I like my yolk thick but a little runny.
  7. Plate the greens and bacon into a little mound on the plate, creating a hollow in the middle for the egg to sit. Drain all the water from the ladle before separating out the egg. Drop egg carefully in center of collard green nest.

Enjoy!

Tuesday, April 13, 2010

Leftovers --> Stuffed Peppers

Facts of life: Suanne hates leftovers. Suanne hates processed food (I'm looking at you condensed soup). Suanne also hates wasting food and taking obscene amounts of time to make a meal.

So what does she do when she has a cup of tofu casserole and half a cup of chinese sliced mushrooms? She reinvents dinner - and makes it look good to boot. These would look fantastic for entertaining and just replace the leftovers with other yummy things, like fresh mushrooms, sausage, quinoa, cilantro, salsa... You get the idea. If it goes will with peppers, you're golden.

Stuffed Peppers
3/4 cup stuffing + 1 pepper = 1 serving. Today's recipe came out with about 4 servings so I'm going to halve the recipe here since I bet you don't want leftovers either.
Total time = 30 minutes prep and 30 min in the oven.


1 cup of leftover stir fry. Will also work with pasta sauce, possibly mac n cheese, or rice casserole. Try it and find out! The less carbs, and the more veggies or meat, the better.
4oz of chicken, boneless, skinless, diced. (Leftover is fine here too)
1/2 onion, diced
2 cloves garlic, minced
1 tsp tomato paste
3/4 cup spinach, cooked and drained.
big pinch of oregano
tiny pinch cayenne and cumin
two red peppers - medium sized.
1 mozzarella stick
1 tbsp cream cheese
parmesan or bread crumbs for topping (optional)


  1. Preheat the oven to 350 degrees with the baking rack in the middle of the oven.
  2. Heat up your saucepan on high with a tsp of olive oil. Saute the garlic, then the onions for a minute or two.
  3. Add the raw chicken (if applicable.)
  4. Add tomato paste. Toss in all your leftovers here and reheat them. Try not to add in extra water - you want a moist stuffing, but not soggy. When you've incorporated everything together, turn the heat off.
  5. Now take the mozzarella and shred it.
  6. Wash your peppers and take a look at them - you want to figure out how to cut them to get the most stuffable space. Most of the time people remove the stem and stuff through the top. I had a curvy pepper so I slit mine sideways. Slice a bit from the bottom so it stands up.
  7. Take a baking pan with walls that are a few inches high. I used a glass 9x9 cake pan. Wipe the bottom with a few drops of olive oil.
  8. By now the stuff in the pan should have cooled off. Stick it all in the food processor and give it a few pulses. Add the mozzarella and cream cheese. Just aim to get rid of the big chunks and make sure to scrap down the sides. If it doesn't look you have enough stuff to fill your two peppers, you can consider adding nuts, leftover rice, or more veggies!
  9. Stuff the peppers. The stuffing doesn't expand so feel free to make a big mound on top. If you like, press breadcrumbs and/or parmesan cheese on top of the stuffing mix. Stand the peppers up in the baking dish.
  10. Bake for 20 - 30 minutes, until the pepper is cooked through. Since the inside is cooked already, don't worry about undercooking it.
  11. Remove the peppers from the oven and let them stand for about 10 minutes. Then devour!

Thursday, April 1, 2010

Sesame Mustard Chicken

My oh so very awesome mother bought me some goodies this weekend: Sriracha hot sauce (my fave!) and sesame oil. Sriracha hot sauce is slightly sweet and is a warm hot. Its addictive, especially on dumplings. Sesame oil is great for marinades and soup - it imparts a very distinctive scent and flavor even with a tiny drop. Tonight's dinner incorporates both.


Sesame Mustard Chicken
single serving, super quick (25 min)

4 oz chicken diced (equivalent to one chicken thigh, no skin or bone)
1.5 tsp mustard (regular American French's is fine!)
2 squirts honey
2 squirts Sriracha (big pinch of cayenne/paprika is fine)
1/4 tsp sesame oil
2 tbsp soy sauce
3 tbsp cooking wine (again, I have leftover beer so that was used instead)
1 pinch ginger powder (or one minced ginger coin)
1 clove ginger, minced

(optional, 4-5 oz chopped spinach, kale, collard greens, broccoli to make it stir fry. Served over half a bowl of white rice.)

  1. I keep all my chicken pre-diced in the freezer in ziplocs. Toss all the ingredients into the ziploc bag with the chicken EXCEPT the garlic. If you forget, that's okay too.
  2. Defrost the chicken - that's right. After you toss stuff in when its frozen, the liquids will help it unfreeze. I also popped mine in a bowl and then the microwave (one minute on 50% power) to speed the process along.
  3. Come back in 10-15 minutes. The longer you let it marinate, the more flavorful it will be. A 10 minute time leaves a very light, sweet mustard taste, so if you're in a rush, no pressure. If you're making this stir fry, chop your veggies here. Or reheat your rice, do 50 crunches, or turn on the TV.
  4. Take the chicken and make sure its defrosted enough so that the pieces are separated from each other. 
  5. Take your skillet, heat it up on high, and toss in a teaspoon of canola oil (or other. Peanut would be yummy but its not something I usually have). Swirl your pan and coat it evenly with oil.
  6. Toss in garlic, cook a minute until fragrant.
  7. Use chopstick or a fork to scoop and drain the chicken from the bag and into the pan. Leave the rest of the marinade in the bag - you'll be using it in a bit. 
  8. Saute the chicken for about 3 minutes on each side. The marinade is watery compared to the oil in the pan, so the oil will pop. Don't freak, just wear long sleeves. As the chicken begins to stick, stir in a little of the marinade to deglaze the pan.
  9. Turn the heat down to medium. Add veggies if you're stir frying.
  10. Make sure your chicken is cooked through and serve!

Monday, March 29, 2010

Collard Greens and Mushrooms

My friend Jon is my city-foodie-friend. We meet up for meals and talk about the merits or Meyer lemons and shiso leaves. Recently he was working in my hometown and picked up kale from my local supermarket. "What's it like?" I asked. "Its a green leafy vegetable, sometimes sweet, sometimes a little bitter" he replied. So when kale was on sale at my local supermarket, I decided to give it a try. ...Except I bought the wrong thing! I picked up collard greens! I really like them actually - its not as sweet as spinach, but not as bitter as some Chinese leafy greens I've had. It strikes a good balance, and at 79 cents a pound, is hard to go wrong. (Kale's not bad either, but I think I like collard greens more!)


Kale and Mushrooms with white rice and leftover barbecue chicken.

Collard Greens and Mushrooms - for one


4 big leaves of collard greens
5 mushrooms (I used baby bella)
1 clove garlic, minced
1 tsp butter
pinch of salt

  1. Chop the greens. The stems should be diced, the leave cut crosswise into strips. Separate the stems from the leaves as the stems will need to cook a little longer. Mushrooms should be cubed into bite sized pieces.
  2. Place your saute pan on medium high heat. Let it warm up a little.
  3. Drop in the butter and swirl the pan to let the pan get an even coating. Reduce heat to medium (butter has a low smoking point, so you don't want to cook it too fast or too hot)
  4. Drop in the garlic and saute until fragrant.
  5. Add stems. Let them saute for about 3 minutes, until bright green.
  6. Add leaves and mushrooms. Saute until leaves are bright green and shiny and mushrooms are darkened.
  7. Add pinch of salt - you really don't need a lot. And remember you can always add more, but never take away - its better to add a little at a time. 
Enjoy! x3 Suanne

Saturday, March 27, 2010

Sweet Potatoes with Fresh Ginger

A little while ago, I was exhausted after a very long day at work. I desperately wanted comfort food, but I really didn't have much energy. So, after surveying my fridge, I discovered a huge sweet potato that I'd bought a few days earlier. Eureka!

I had visions of Thanksgiving - the ultimate comfort food holiday. Incidentally, I missed last Thanksgiving entirely because I had Swine Flu - ugh! I decided to reclaim at least part of my lost holiday and make this awesome, entirely satisfying dish.

Sweet Potatoes with Fresh Ginger
1 large sweet potato, peeled and chopped into 1-inch cubes
1 tbs. freshly grated ginger
2 tbs. butter
1/4 cup ginger tea (or water, but ginger tea gives it a really good flavor)
2 tbs. brown sugar
2 tbs. sour cream (optional, but makes the dish a little creamier. And no, you don’t taste it!)
A few pinches of salt

1. Toss sweet potato, ginger, butter, tea, and brown sugar in a two-quart, microwave-safe bowl. Cover with plastic wrap.
2. Place bowl in microwave for 8 - 10 minutes, stopping to stir the mixture every two minutes or so.
3. Once all of the sweet potatoes are softened, mash the bowl ingredients together.
4. Blend in sour cream (either with a fork, a potato masher, or an electric mixer - it depends on whether you want them to be lumpy or smooth). Taste.
5. Add salt to taste. **Remember: A little bit goes a long way! The goal is not to make salty sweet potatoes, but rather to bring out the subtlety of the other flavors.**

Makes about four to six servings, depending on how you portion it. Store leftovers in the fridge for up to a week, or in the freezer for four to six weeks.

AH-mazing Tuna Salad

While I normally pride myself on having a well-stocked kitchen, today was one of those rare days when I was scraping the bottom of the barrel. So, as dinnertime crept ever closer, and my tummy started grumbling, my mind struggled to come up with a way to combine the odd items in my pantry and fridge into some semblance of a real meal. "Protein," I thought, "I want protein." But, alas, having not purchased groceries in almost two weeks, both my fridge and freezer were devoid of meat. As I rummaged through my pantry, looking for something - anything - that appealed to me, I found it: tuna!

"Tuna?" you say, "Really?" Oh. Yeah. Within seconds, I had a game plan and my final results were simple and delicioso! Read on for my recipe!

AH-mazing Tuna Salad

2 - 5 oz. cans tuna, drained
1.5 tbs. mayo
1.5 tbs. horseradish sauce (which I ALWAYS keep on hand)
1 tsp. lemon juice
2 tbs. red onion, minced
1/4 tsp. dill
salt
fresh ground pepper


1. Place tuna in a non-reactive bowl.

2. Add mayo, horseradish sauce, and lemon juice. Mix until well-blended.

3. Mix in onion.

4. Add dill. Taste. (It's always good to taste as you go; otherwise, you're cooking blind!)

5. Add salt and pepper to taste.

Serve as is, over salad greens, or on toast. Store leftovers in the fridge for two to three days.

Helpful hints:
- Use a non-reactive (like glass or plastic) bowl. When you mix high-acidity foods (such as lemon or tomato) with metal, your dish can take on a metallic taste - bleh!
- Normally, I'm not a fan of lemon (neither is Suanne, for that matter); however, it does have some helpful uses. I add a touch of lemon just about anytime I use frozen or canned seafood. It seems to restore some freshness to the meat. And if you only use a small amount, it's usual undetectable.

Tuesday, March 23, 2010

Fool-proof Barbecue Chicken

I grew up cooking with Mom and one of her weekly staples was barbecue chicken. Not very traditional for a Chinese mom - except for one super ingredient! Soy sauce.

Marinades help make your meat super yummy for a few reasons. Certain ingredients, such as soy sauce and vinegar, have enzymes that help break down meat. This allows the meat to absorb more liquid and make it more tender. Its activated by the contact to the ingredients and heat. (So if you have a big cut of meat, poke some holes in it to let the marinade get in better.)

Today's marinade is made of things that are usually readily available in your kitchen. Its not an exact art, so feel free to tweak as you like!


Fool-proof Barbecue Marinade (for four chicken thighs, or equivalent. Great for pork too!)

Marinade:
1/4 cup soy souce
1/4 cup cooking wine (today I used beer. I'm not going to drink it, so might as well cook it!)
3 tbsp ketchup
4 tsp mustard
2 coins of ginger, minced
2 cloves garlic, minced
1/2 tsp cayenne
1/2 tsp cumin (optional)

Toss it all in a big bowl or tupperware. Stir well. Add the chicken and turn them in the marinade to coat well. I let my chicken marinate for about half an hour before it went in the oven. If you don't want to cook it all now, cover the rest and put it back in the fridge. It can stay marinating for another three days or so.

Preheat oven to 400 degrees. Place chicken in an baking tray non-skin side up (either glass or a roasting pan with a rack is fine.) Place in middle of oven for 20 minutes. Turn over, skin side up, and spoon and extra teaspoon of marinade over the top. Cook for an additional 25 minutes. Always check to make sure it isn't pink in the middle!

CAUTION - after you've had chicken sitting in the marinade, its not safe to use for a sauce. If you do want to use it, I would cook it on the stove at a boil for at least 10 minutes.

Monday, March 22, 2010

How to Poach an Egg

stalking people on Foodgawker (http://foodgawker.com/?s=poached+egg&cat=0) and seeing the beautiful pics of sunny eggs in their white pajamas made me smile! Now, little known fact about Suanne - I usually HATE eggs. Especially scrambled! But if I can get it fried or poached, well, gosh darn it, its pretty good with salt and pepper.

So today I whipped up some kale and garlic and set a pot of water to boil to poach the egg. Kale came out perfectly! (I've never made it before, but its like any other green veggie. 3 big leaves + tsp butter + 1 clove garlic. Heat butter n garlic first on medium heat, toss in kale when the garlic is fragrant, and sautee until bright green. No longer than that.)

Then the poached egg. How hard could it be? My water is boiling and I drop in the egg and POW! its egg drop soup  - but the yolk is still intact haha. And I'm trying to fish it out after a minute or two with a spatula, which makes it break apart. Where did my slotted spoon go? Silly me. Anyway, its tastes great but doesn't look as cute as I wanted.

So here are the directions for Poached Eggs, stolen from Epicurious


Enjoy!

Sidenote: There is a small risk of salmonella for raw eggs - about 1/20,000. I'll take my chances, but just FYI.

Wednesday, March 17, 2010

Because we're grammar nerds and source nazis

If its worth eating, its worth pronouncing.  http://chicago.grubstreet.com/2010/02/menu_minefields_how_do_you_pronounce.html

And after you're done reading and feeling cultured, go make some homemade butter: http://allrecipes.com/Recipe/Homemade-Butter-2/Detail.aspx

Monday, March 15, 2010

Cooking Emergencies

Even though you imagine your menu, thoughtfully prepare your ingredients, and tie your apron strings just so, sometimes you make stuff that tastes like $#!*.

I know it happened with me this weekend! I tried a new recipe for Butter Chicken (but its a misnomer, I think it was more Chicken Masala like) and accidentally added too much cayenne. Whats a girl to do?

I fixed it the day after with a puree of nuts, milk, and some rice. Totally did the trick and made the dish uber rich tasting.

For other fixes, here's a fantastic link :)

http://www.cheftalk.com/cooking_articles/Cooking_Techniques/207-When_Things_Go_Wrong:_A_Guide_to_Fixing_Kitchen_Disasters.html

Monday, March 1, 2010

Tofu Stew

It was a cold day in New York. The wind whistled around corners and down alleys, chilling everything to the bone. After hours of frozen fingers and florescent lighting, there was only one hope:

Tofu Stew. Something so hearty, so full of stuff, so hot - it works miracles.

Yesterday we left our heroine with a big pot of chicken stock. What that really amounted to was 3 servings of pure chicken stock (as in clear, and with no stuff, about 1.5 cups each) and 3 servings of "stuff." In my opinion, the "stuff" is the best. Its all the leftover meat from the bones, the veggies, and the junk at the bottom of my hard work in a pot. The stock went in the freezer, the "stuff" to the fridge (if you freeze it, the veggies will only get mushier). Today's tofu stew uses 1.5 cups of "stuff."


Tofu Stew - 1 serving, 1.5 bowls

1.5 cups of "stuff" which is mostly the soup veggies and chicken meat, with just enough broth to cover it.
1/3 block of silken tofu (I'm a big fan of silken. I told my boyfriend if he didn't like silken, we can't get married, that's how much I love it)
2 leaves napa cabbage
3 button mushrooms
1/2 teaspoon of salt
dash of pepper

  1. Heat up your "stuff" in a soup pot.
  2. Slice open the tofu package. There will be a lot of water in the package, so do this by the sink. Pour some of the water out and spoon out the tofu into the soup. (Doesn't need to look pretty). Leave the rest of the water, so the remaining tofu stays moist. If you don't, you get firm tofu :(
  3. Cut the cabbage into inch long slices horizontally. Slice the mushrooms.
  4. When the tofu and stuff is simmering happily, toss in the sliced veggies - these only need about 3-5 minutes to cook. Add more water if it isn't enough to cover everything in the pot.
  5. Taste test! Add salt and pepper as needed. Tofu and veggies do exude a lot of water as well as absorb all the seasonings in the "stuff" so you will need more!
  6. Enjoy!

Simple Chicken and Veggie Stock (Homemade Chicken Broth)

I bought a giant family pack of chicken thighs on Friday, anticipating that I'll be cooking next week. I buy family packs and divide the meat once I buy it into single serving portions. The majority gets deboned, skinned, diced, and into little sandwich baggies for the freezer. (all labeled neatly with the date of course) Its not a clean job, but that one hour of prepping the chicken saves me a lot of time come Tuesday night when I hate my job, my life, and all I want is stir fry and a pillow.

Like my mom (the master of penny pinching), I save the thigh bones in a nice big quart sized freezer bag. When the bag is full, I make chicken stock! Now homemade chicken stock is awesome for a few reasons: you save money, you can save the stock into the portions you need, and you can tailor the stock just how you like it! Personally, canned broth tends to be too salty for me and I actually only want half the can. Which means, I pour in a quarter of  a can, then a quarter cup of water, and then have to figure out how to save the rest. :-P I like my broth a little less concentrated, not too salty, and with a good round veggie flavor.


Homemade Chicken Stock

Olive oil
1 quart bag of chicken bones (no skin, remove as much fat as you can, defrosted!! Having leftover meat on the bones is cool.)
3 cloves garlic
2 coins of ginger root
1 big carrot
2 ribs celery
1 onion
1 parsnip (optional)
1 bay leaf (sorta optional)
salt, pepper to taste

The process:
  1. Large dice the veggies (mirepoix, as the French say. Smash the garlic cloves with the back of your knife and cut two coins of ginger root, about a millimeter thick. This stuff doesn't need to be pretty, so no pressure to be exact about keeping things the same size.
  2. Get a large stock pot (say 4 quarts?). Put it on the burner on high heat, add a tablespoon of olive oil, and let the pan heat up first for about 30 seconds.
  3. Dump the chicken bones in. You're looking to sear/brown the bones. Sounds unnecessary, but definitely gives your stock a better flavor. The brown bits will stick to the bottom of the pan. Brown bits = yummy.
  4. Dump in your onions, garlic and ginger and turn the heat down to medium high. Mix them around with your trusty wooden spoon and scrape the bottom of the pan to "deglaze" the brown bits. The water in the onions will help the brown bits come off.
  5. Add the celery, carrots, and parsnip. Make sure you've gotten as much of the brown bits off as you can.
  6. Add water and the bay leaves. Add enough to cover the bone/veggie mix and then some. For me this ended up being 3.5 quarts. Don't fill to the absolute top of the pot or once it boils you have a mess.
  7. Leave it alone for a bit (a good time to clean up). When the pot starts to simmer, turn it down so it stays at a simmer and does not boil. About 20 minutes in, you'll start seeing a lot of gray scum float to the top of the stock. Its totally normal. Start skimming off the scum with your ladle, being careful not to get too much stock with it. (This is a skill you'll have to practice). Dump the scum down the sink and run some hot water after it. As the stock continues to simmer, check back every 20 minutes or so, skimming more scum off each time. Eventually you'll get it most of it.If you don't get rid of the scum or accidentally let the stock boil in the scum, you get cloudy chicken broth. It won't kill you, but it looks pretty gross.


  8. After you get most of the scum (say an hour after you add the water?) add the pepper and salt. I used about 2 teaspoons of salt and a teaspoon of pepper for my 3 quarts. Let the pot simmer for about three hours. The longer the better really. I let mine sit overnight. Taste it periodically and see how you're doing. 
  9. Drain! I usually spoon just plain broth into ziplocs. As I get to the bottom of the pot and its hard to navigate around all the goodness on the bottom, grab a sieve and another pot or pitcher and drain the whole thing. While there's not much left to do with the bones, I personally love the veggies and I'll eat them right up. The chicken veggie mix is perfect to take it one step further for chicken soup, when you just add in a handful of rice or noodles and diced chicken.

How to store it:
ice cube trays
Ziploc sandwich sized bags (store it upright, lined up in a container. Break off pieces as needed.)

What to do with it: soup, flavoring veggies or rice, deglazing pans, making sauces.

Tuesday, February 16, 2010

Before we begin...

Our Mission!
To share healthy, super delicious, and easy to make meals for the young singleton.

To make cooking more accessible and enjoyable.
To become better than average cooks, using fresh ingredients and the right tools.
To encourage experimentation, dialogue, and community.

Our Format
Recipes - Separated into Meal (Breakfast, Lunch, Dinner, Dessert, Snacks), Main Ingredient (Chicken, Beef, Veggie)
Secrets of a Chic-Pea - Shortcuts, Tools, the Pantry, What's in Season, Chic-Pea Science

Followers